Pages

Tuesday, 26 July 2011

Is it a cake from Africa that can fly.........?

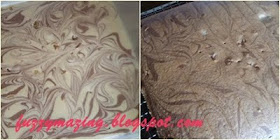
           As I was looking through the recipes that I've compiled over the years,  I sometimes wondered how  some of the creators of the recipes decided on the names of  their creations because, by just looking at the names, you'd never be able to guess what exactly they are. The only clue in the name is 'cake', 'cookie', 'roll', etc. For example, the original name of the Jelly Tip Roll that I baked recently is actually Secret Sunset Roll....Do you see any resemblance when you see the cake and its original title? I don't. So I decided to change it. ( Errr.....am I allowed to do that?) Another example is Fly African Cake....but  this time I'm sticking to the original because I think I've just figured out why the name is such....& it does make sense!


          I've had this recipe for decades & made this many times but never questioned the name until recently when my good friend & baking product taster, Nura, commented about the cake. (By the way, this lady always makes me think....about everything, even the mundane things....so I thought!) I gathered she didn't really like the cake because it's not rich like butter cake. She wondered if it's a healthy cake.... Well, you can say it is a healthy cake because it uses only 2 egg yolk but 12 egg white. So the taste is lighter than butter cake but still delicious......I think. It's so light that it can 'fly'....... you reckon.....?  'Africa' is associated with zebra & maybe this cake is supposed to have strips like a zebra. Hence the name 'Fly African Cake'!


          Ok...so much for names. Let's talk about the real thing, the cake itself! This recipe was given to me by my cousin about 30 years ago. She was the one who introduced me to weekend baking classes. I used to bake a lot of this. For one, it's simple to make and taste delicious (as far as possible, use the butter oil essence as it makes a lot of difference). The main reason is, it helps me to use up some of the leftover egg white after making layered cakes. Do try it especially if you have some egg white!


Fly African Cake
A
12 ...........................egg white (about 500g)
2..............................egg yolk
200g........................sugar
250g .......................cake flour
1tsp.........................baking powder
50g .........................cold water
1 tbsp..................... ovelette

B
3 tbsp..................... sweetened condensed milk
200g....................... butter (melted)
1 tsp......................  butter oil essence ( I used pure vanilla paste but I like this cake with butter oil essence better)

C
1 tbsp..................... chocolate paste ( I used 1 tbsp cocoa powder &  1tbsp canola oil, mixed into paste.)
100g....................... walnut (chopped into small pieces)


Method:
  1. Preheat oven to180 deg C.
  2. Line a 10x10 inch cake pan & grease lightly.
  3. Combine A into a mixing bowl and beat at high speed until thick & fluffy for about 8 minutes.
  4. Add in B & mix thoroughly, preferably using hand.
  5. Divide mixture into 3  parts. Add C into 1 part & stir thoroughly. Leave the other two parts plain.
  6. Place the mixture into the prepared pan by alternating spoons of plain mixture and chocolate mixture. Scatter walnuts after every plain mixture. Then, with the end of a wooden spoon or stick, gently draw swirls through the mixture to marbleize it. Don't over mix or you won't have the marble affect.
  7. Bake at 180 deg C for 20 minutes.Then reduce temperature to 160 deg C & bake for 20 more minutes or until stick inserted comes out clean.
  8. Remove from pan and leave to cool.

Sunday, 24 July 2011

I'll call it Jelly Tip Roll.......

              One of my sources of recipes has been the weekend baking classes I've attended since I was a teenager.... that's 30 years ago!!! These classes are carried out by enterprising ladies who normally also take orders for their baked products. One of my favourite 'teachers' is Kak Aini Salim, who is well-known in Singapore, Brunei & Malaysia.


           Last weekend, I made Jelly Tip Roll which I learnt to make during one of the classes conducted by Kak Aini. And I've chosen to bake a roll cake because I'm submitting this post to Aspiring Bakers #9 - Swiss Rolling Good Times  hosted by Obsessedly Involved With Food.

       
           Actually, Jelly Tip Roll is not the original name of the cake. But I've decided to change it so that it's self-explanatory. Everything else is pretty much the same. I've made this cake  a few times, but this  time, I went overboard with the  cream when rolling it. That made the roll too sweet. So next time, I'll go easy with the cream.


Jelly Tip Roll
(makes 2 rolls)

Sponge cake :
          A                                                                          B
          6 ..................egg yolk                                          1/4tsp ...........raspberry essence
          3 ..................egg white                                        80ml .............melted butter
          100g ............castor sugar
          60g ..............cake flour                                        C
          20g ..............corn flour                                         fruit top/ jelly tip (rinse & pat dry with paper towel)
          1/2 ...............tsp baking powder                           red colouring
          30g ..............strawberry ice-cream powder           
          2 tbsp ..........cold water
          1 tbsp ..........ovalette (stabilizer)


Method:
  1. Preheat oven at 180 deg C.  
  2. Line two 25x25x2.5 cm  (10x10x1 inch)  pan with grease paper & lightly grease it.
  3. Combine all the ingredients in A in a mixing bowl. Using an electric cake beater,  beat  on high speed for about 8 minutes.
  4. Add in B & mix thoroughly, preferably using your hand.
  5. Spoon out about 150g batter into a bowl & add in the red colouring. Mix thoroughly.
  6. Pour the red batter into pan to fill up part of it. Pour plain batter to fill up the rest of the pan. Then scatter the jelly tip evenly on the plain batter. Bake for about 10 minutes. Cool the cake.
  7. Place cake on a tea towel & spread  cream evenly onto cake.Then roll  starting from the red part.
  8. Wrap the roll with grease paper and chill it before serving.
Butter cream:
100g...................butter
80g ....................icing sugar
75g ....................cold water
1/2 tbsp .............strawberry ice-cream powder
a few drops.........red colouring

Cream butter & sugar until fluffy. Then add  cold water, a bit at a time. Continue creaming until well-conbined.

Saturday, 16 July 2011

Spicy Almond Butter Cake

          I love today's weather. It started with the rain late last night and so this morning, it was cool and breezy....... Afternoon is just slightly cloudy & still breezy, a perfect weather for a picnic at the beach or park! For me, a good part of the day was spent  going in and out of the house.... At 8, I sent my son, Maisur, to his madrasah class & came back. Then went out again to accompany the other son, Amir, for his tuition class at United Square. In the meantime, my daughter, Maliah, fetched Maisur from class. Actually today is a typical Saturday for me except that I don't get to use the car  as my husband needs it to ferry his parents to JB. So it took slightly longer as we  travelled on the bus & train....


           Yesterday after work, I baked Spicy Almond Butter Cake. I got this recipe when I attended a baking class conducted by a lady, Nurul Imah, at her place about a year ago. Nurul is a generous lady.....she often attached bonus recipes for her students. She even threw in samples of the cakes. And this was one of her bonus recipes. I remember eating & liking this cake! So as I was looking through my collection of recipes, I decided to try this.

Nodic Ware Rose (left) & Tea Cake Pan (right).
        
          This lightly-spiced cake is delicious. Keep it overnight, and it tastes better as the flavour matures & it becomes more moist. I used the Nodic Ware mini pans - the rose pan & the tea cake pan. But I'm not sure why the bottoms turned out differently. Only thing I did differently was, because there wasn't enough batter to fill up the tea cake pan, I poured some water into the empty mould before putting the pan into the oven. Wonder if that was the cause.... Anyway, try this recipe....who knows this could be one of the cakes on your table during the Eid celebration.


A
250g................ butter (softened)
60g.................. dairy whipping cream
1 tsp................. vanilla essence ( I used pure vanilla paste)
50g................... honey
30g................... ground almond

B
300g ................. self-raising flour (I used cake flour plus 1/2 tsp of double-acting baking powder)
1/4 tsp..............  nutmeg powder
1/2 tsp.............. .cinnamon powder

C
220g.................. castor sugar ( I used 200g)
6 ........................egg white

D
10 ......................egg yolk

Method:
  1. Turn on the oven & set the temperature at 180 deg C.
  2. Grease a 9x9x3 inch pan ( I used the Nodic mini pans, so I didn't grease them). Line bottom of the pan with grease paper.
  3. Combine A & whisk until thoroughly mixed. Set aside.
  4. Combine B & sieve. Set aside.
  5. In a clean & dry mixing bowl, combine C & beat until stiff peaks formed. Then add D, one at a time. Continue beating until thoroughly mixed. Stop beating.
  6. Add in A & using a hand whisk, gently mix thoroughly.
  7. Then fold in B until .
  8. Pour mixture into the greased pan & bake for about 40-60 minutes or until a toothpick inserted in the center of the cake comes out clean.

Cookies N Cream Gelato.

           You may be wondering why I'm making so much ice-cream. Well, that's because everytime I plan to make ice-cream, I'll have to buy the whipping cream & it normally comes in a 1-litre carton which is  good for 4 batches of recipes. Once opened, I have to finish it within few days. Otherwise, it'll have to be thrown away......


          Cookies & cream ice-cream is at the top of the list of my family's most favourite flavour. It's basically vanilla ice-cream with broken chocolate sandwich cookies added to it. So here's the recipe I've adapted from Torrace Kopfer. Enjoy....


Ingredients:
2 cups (470ml).............................whole milk
1/2 cup (100g)............................. granulated sugar
4 (large) .......................................egg yolks
1 cup (235ml)...............................dairy whipping cream
1/2 tsp..........................................pure vanilla paste
6...................................................Oreo cookies (I removed cream & broke into small pieces. 3 to 4 hours before churning the chilled mixture in the ice-cream maker, place cookies in the freezer.)


Method:
  1. Combine the milk and about 1/2 of the sugar in a medium-sized, heavy-bottomed saucepan. Place over medium heat and cook, stirring occasionally, until it registers 77 deg C (170 deg F) on an instant-read thermometer.
  2. In a medium bowl, whisk together the egg yolks and the remaining sugar until foamy and slightly thickened.
  3. Carefully and slowly, pour about half of the hot milk to the eggs, whisking continuously. Pour the heated egg mixture into the saucepan with the hot milk and return to the stove top.
  4. Stirring continuously with a wooden spoon, cook the mixture over medium heat until it registers 85 deg C (185 deg F) on an instant-read thermometer or is thick enough to coat the back of the spoon or spatula,  Do not allow the mixture to boil. Remove from the heat. If the mixture is not completely smooth, emulsify it by using a hand whisk or stand  blender and blending it until smooth, before proceeding to the next step.
  5. Combine the whipping cream and vanilla paste in a stainless steel or glass mixing bowl and stir until the powder dissolves and set it over an ice bath (i.e. a bowl filled with ice & cold water).
  6. Pour the heated custard through a strainer into the cold cream and stir until fully incorporated and the mixture has fully cooled. Then remove the bowl of  mixture from the ice bath, cover with plastic wrap and chill in the refrigerator for at least 8 hours or overnight.
  7. When ready, pour the chilled mixture into the  ice-cream maker and process according to manufacturer's specifications. Add in the frozen cookies about 10 minutes before the end of the churning process.
  8. Remove the finished gelato from the ice-cream maker and place it in a plastic container. Cover with plastic wrap or silicone paper by pressing the wrap or paper gently against the top of the gelato.Affix lid to container and place in the freezer to fully harden before serving.
Makes about 1 litre.

Friday, 15 July 2011

When fresh is not the best.......

          When I first made Mint Chip Gelato, I used fresh mint leaves which were immersed in  warm milk to produce natural mint flavour. But my family did'nt like it.... Amir said it tasted 'strange'! So this time, I used peppermint essence instead. "Now it tastes normal!" said Amir. Actually, I like the essence better too.....


           I don't really like taking pictures of ice-cream, especially on a hot day like we've been having the past few days. With  Ramadan arriving in two weeks, I hope the weather will have some mercy on us.....like today when it rained for a while. Anyway, this gelato is certainly a soothing dessert on a hot day!


Once again, I've adapted Torrance Kopfer's recipe found in Making Artisan Gelato.

Ingredients:
2 cups (470ml).............................whole milk
1/2 cup (100g)............................. granulated sugar
4 (large) .......................................egg yolks
1 cup (235ml)...............................dairy whipping cream
1/4 tsp..........................................pure vanilla paste
1 1/2tsp........................................peppermint essence
1/2 cup (90g)................................chopped dark chocolate (leave the chopped chocolate in the freezer for a few hours before adding to the gelato)


Method:
  1. Combine the milk and about 1/2 of the sugar in a medium-sized, heavy-bottomed saucepan. Place over medium heat and cook, stirring occasionally, until it registers 77 deg C (170 deg F) on an instant-read thermometer.
  2. In a medium bowl, whisk together the egg yolks and the remaining sugar until foamy and slightly thickened.
  3. Carefully and slowly, pour about half of the hot milk to the eggs, whisking continuously. Pour the heated egg mixture into the saucepan with the hot milk and return to the stove top.
  4. Stirring continuously with a wooden spoon, cook the mixture over medium heat until it registers 85 deg C (185 deg F) on an instant-read thermometer or is thick enough to coat the back of the spoon or spatula,  Do not allow the mixture to boil. Remove from the heat. If the mixture is not completely smooth, emulsify it by using a hand whisk or stand  blender and blending it until smooth, before proceeding to the next step.
  5. Combine the whipping cream and vanilla paste in a stainless steel or glass mixing bowl and stir until the powder dissolves and set it over an ice bath (i.e. a bowl filled with ice & cold water).
  6. Pour the heated custard through a strainer into the cold cream and stir until fully incorporated and the mixture has fully cooled. Then remove the bowl of  mixture from the ice bath, cover with plastic wrap and chill in the refrigerator for at least 8 hours or overnight.
  7. When ready, pour the chilled mixture into the  ice-cream maker and process according to manufacturer's specifications. Add in the frozen chopped chocolate about 10 minutes before the end of the churning process.
  8. Remove the finished gelato from the ice-cream maker and place it in a plastic container. Cover with plastic wrap or silicone paper by pressing the wrap or paper gently against the top of the gelato.Affix lid to container and place in the freezer to fully harden before serving.
Makes about 1 litre.

Sunday, 10 July 2011

Steamed Yogurt Cupcake

          Today has been quite a productive day. That's because I was home almost the whole day as my husband is recovering from  flu. We only went out for a quick breakfast. So I managed to bake some macarons, prepared an ice-cream mixture (which I hope to churn tonight) and now I'm writing this post. 


          I actually made the Steamed Yogurt Cupcake last weekend after I saw the recipe on Dayang's blog, DapurKu Sayang. It turned out that the recipe was first posted by Rima. I was quite please with the my cakes because most of them 'opened up'. The cakes were moist and  tasted very good too. 


 I followed Dayang's recipe which  she adapted from the original recipe:

1 cup ...................plain flour
1 tsp ....................baking powder (I used 1/2 tsp double-action baking powder)
90g ......................castor sugar
1 tsp.....................ovelette (an emulsifier)
1.......................... egg
1/4 cup................. yogurt
1/3 cup................. evaporated milk
1 tsp..................... vanilla essence (I used pure vanilla paste)
1 tsp..................... cocoa powder
1/2 tsp ................ .coffee paste


Method:
1. Combine all the ingredients, except the last two, and beat using an electric mixer until the batter becomes pale, thick and the whisk leaves a vivid trail when stirring through the batter.
2. In a small bowl, remove 5 tablespoon of the batter and add in the last two ingredients. Stir well.
3. Drop the plain batter into the cups. Then drop a teaspoon of the chocolate batter on top of the plain batter.
4. Steam on high fire for about 15 to 20 minutes.

Is that macaron or sandwich cookie.........?

          I've tasted macarons before but I thought they were too sweet. So never really wanted to bake them until I saw Rima's 4th giveaway challenge. I thought this challenge was a good excuse for me to try baking them for the first time. And hopefully, I'm lucky enough to win the  macaron baking sheet!


          Luckily my macarons don't have to be perfect to qualify for the draw.......so I'm good! As you can see, my macarons don't look like macarons. If I don't tell you they are macarons, you'll probably think they are chocolate sandwich cookies! Never mind...... at least I tried! Thanks to Rima for giving me the incentive to try baking these. Whatever the outcome of the draw, I'm happy that I've tried. Of course, I'll be happier if I won the prize...hehe.
        

             I made Chocolate & Lemon Macaron and  the recipe is from Dailydelicious This lady makes very nice macarons. Even her  first try was perfect. So there's nothing wrong with her recipe.....I just have to practise baking macarons again. 


Monday, 4 July 2011

A Weekend of Two Weddings..........

            I started writing this post more than a week ago but didn't manage to complete it. I was just too tired.... So today, come what may, I'm  going to post it!

          Three weekends ago was a busy one for my family, including my  extended paternal family, as we attended two weddings in Malaysia. We left on Friday morning, hoping to avoid any traffic jam at the Tuas Checkpoint. Alhamdullillah, the  drive through the checkpoint and on the  NS highway on Friday  was a breeze. We stopped at the Ayer Keroh  overhead bridge rest stop (I've never seen the place so peaceful...) for lunch and reached Seremban just in time for my husband and father to go  to  the Seremban State Mosque for the Friday prayers.

     
           In Seremban, we attended  Fairuzzabadi and Ros Aida's wedding dinner on Saturday night. The groom's parents are my cousins. It was quite a grand wedding. Not sure how many guests were there, but all the tables in the big hall were filled up.


                    The good thing about having a wedding dinner is  all the guests came at about the same time. So I was able to meet  many relatives, both Singaporeans and Malaysians. We exchanged greetings and caught up on the latest gossips...... My father was quite busy mingling with our relatives!


          As usual, for any wedding, besides the groom and bride, the wedding cake was also the center of attraction. What a beautiful cake! It was made by the super talented Nahdzah, the groom's cousin. She wasn't at the wedding as she was in Sydney to up her skills in cake decorating at the Planet Cake Decorating School. You go girl! See more of her amazing creations on her blog  CUPCAKES.COM.MY.


          Right after breakfast on Sunday morning, we headed for Kuala Lumpur for my cousin, Husni, and his bride, Maiza's wedding. Theirs was held at the groom's residence in Lembah Keramat.


           We were there early, so it was pretty quiet at first. But as the day goes by,  more guests turned up. But my boys were already restless after we were there for about 4 hours.  So we left after the photo-taking session.


          Like all Singaporeans, one important agenda  we have whenever we are in Malaysia is to eat. Eat we did to our heart's content!! (Oh.... now I remember why I was so tired after our return. Besides the usual errands and more as school was reopening, I also went to the gym 4 times that week! That was more than my usual 2 to 3.) When we were in Seremban,  my brother, the explorer, brought us to the famous Haji Shariff's Cendul  outlet.


          The shop was super clean, the service was fast and friendly and the food was really, really good! It makes many versions of  cendul. The ones I can remember are cendul jagung, cendul pulut and cendul campur. It also sells rojak and mee rojak. We each had a bowl of the regular cendul. My brother and husband also had the cendul campur. The mee rojak ( or was it rojak mee....) is actually  yellow noodle mixed with the usual fritters, served with the rojak gravy. Yummy........

Cendul and Mee Rojak