Pages

Wednesday, 19 November 2014

Satay Pau

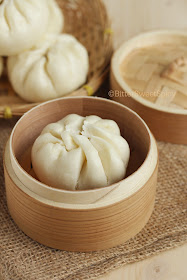
Yesterday, I posted my Satay Buns entry.  This morning, I'm posting another satay-based finger food, Satay Pau. I used the same satay filling recipe & the dough recipe was one which I got from a weekend class more than ten years ago. I've not used this recipe for many years. At first, I wanted to try the recipe used by Victoria, but hers involves 3 days of preparation. For me, that really needs a lot of planning. So I decided to use this recipe which just required 2 days of preparation. Even then, I had to throw the first starter dough after it was left to ferment for more than 24 hours as I had to make an unscheduled trip to Johor to attend my hubby's uncle's funeral.


The idea to use satay filling came after eating satay pau I bought in Malaysia recently. I love the combination, but the satay filling was too sweet to my liking. I know satay is supposed to taste sweet, but that was just too sweet. For this homemade pau, I decided to use my mum's satay recipe. This time, the filling is more moist than the one I made for my satay buns after adding some cornflour & water mixture. The dough is good too. The pau is soft & fluffy although denser than the commercial ones. Still, I like it a lot. The next pau recipe I'm going to try will be the one Victoria used, with chicken filling, of course.


Satay Pau

DOUGH
Starter
Ingredients:
140g Hong Kong flour
1/4 tsp double-acting baking powder
90g water
1/4 tsp instant yeast
Combine all the ingredients in a bowl & mix until well blended.  Cover & leave in room temperature to ferment for at least 16 hours, up to 24 hours.

Final Dough
Ingredients:
1 quantity of the above starter dough
200g Hong Kong flour
2 tsp double-acting baking powder
1/4 tsp ammonia (The one I bought from Phoon Huat is labelled as ammonium bicarbonate.)
85g fine sugar
45g tap water
1/4 tsp lye water or vinegar (I used vinegar.)
13g vegetable shortening (I used Crisco.)

Method:
  1. Combine flour, baking powder & ammonia & sift in a mixing bowl.
  2. Add in the starter dough, sugar, tap water & lye water or vinegar. Mix until just combined.
  3. Add in the vegetable shortening & continue mixing until well combined & a soft dough is formed. (I mixed it using my mixer using the dough hook for about 10 minutes.) Leave dough to rest for about 15 minutes.
  4. Divide rested dough into small balls. (I divided mine into 18 balls of 30g each.) Roll each dough into a disc. Spoon filling & pleat. Place the pau onto a piece of parchment paper. (I place each pau onto a small paper cupcake liner which has been flattened.) Do  the same with the rest of dough.  Steam on very high fire for about 15 minutes. (You DO NOT need to leave buns to proof before steaming.)
Recipe by Hamidah Rusdi, with some minor modifications.


BEEF SATAY FILLING
Ingredients:
200g ground beef
1 1/2 tbsp ground coriander seeds
1 1/2 tsp ground cumin
1/4 tsp tumeric powder
1/2 tsp salt (adjust to taste)
3 tbsp very dark brown sugar  - adjust amount based on your preference
1/8 cup ground toasted peanuts
1 tbsp tamarind juice
1 tbsp cooking oil
1tbsp cornflour + 3 tbsp water 

ground into paste
4 small red onions
1 clove garlic
2 cm galangal (lengkuas)
1 stalk lemongrass (white part only)

Method:
  1. Combine all the ingredients above, except oil & cornflour mixture, & mix thoroughly. Leave to marinate in the fridge for 1 hour. 
  2. After 1 hour, heat up the oil in a frying pan. Add in the meat mixture & stir frequently until it's cooked. (If the mixture is too dry when cooking, add some water.) Pour in the cornflour mixture & stir well. Transfer the cooked filling into a colander to drain any excess liquid. Leave to cool before wrapping in the dough.

Tuesday, 18 November 2014

Satay Buns

I've seen many bloggers baking soft buns, the kind that we Asians like. One of the recipes that has been making its rounds is the Kopitiam Milk Buns that was shared by Sonia. Besides the plain version, she also made use of this recipe to make some curry buns


Her curry buns inspired me to bake some filled buns. But I decided to fill mine with beef satay filling. No wonder this bun recipe is so popular. The bun is so soft &, more importantly, it is so fragrant & so delicious! Big thumbs up for this recipe! And the satay filling just makes these buns so irresistible!!


I was also inspired to decorate my buns by one & only Victoria. If you had been following her, you would have seen how she has been showcasing her creativity in her baking products. I can't draw well, so  nobody could figure out that I had drawn some sticks of satay on my buns. They all thought that they were some flowers or wheat! ^_^ 


DOUGH
Overnight sponge dough:
215g high protein flour
125g full cream milk (cold) - I used 135g.
2g instant yeast (1/2 tsp)
Mix all ingredients in a bowl till a rough dough is formed. Cover the bowl with cling wrap and store in the fridge overnight.

Basic dough:
1 quantity of above overnight sponge dough
90g high protein flour
12g milk powder (Sonia didn't use.)
30g egg (1/2 large egg)
4g instant yeast (1tsp)
3g fine salt (1/2 tsp)
60g sugar
45g butter (room temperature) - I used only 30g.
1tbsp milk (cold)
for egg wash, combine 1/2 egg & 1/2 tsp of milk

Method:
  1. Tear the overnight sponge dough into pieces into a mixing bowl. Add in the rest of ingredients, except butter, & knead till a smooth dough is formed. 
  2. Add in butter and knead until dough is smooth, shiny and elastic. (I mixed mine using the electric mixer [dough hook] for about 10 minutes in all.)
  3. Cover the bowl with cling film and set aside to proof till double in size for 45-60 minutes. (I poured the dough onto a floured working surface & mould it into a smooth round. Then I covered it with the unwashed bowl that I used for mixing.)
Source: Sonia @ Nasi Lemak Lover.

BEEF SATAY FILLING
Ingredients:
200g ground beef
1 1/2 tbsp ground coriander seeds
1 1/2 tsp ground cumin
1/4 tsp tumeric powder
1/2 tsp salt (adjust to taste)
3 tbsp very dark brown sugar  - adjust based on your preference
1/8 cup ground toasted peanuts
1 tbsp tamarind juice 
1 tbsp cooking oil
1tbsp cornflour + 3 tbsp water (I didn't use this. Refer to note no. 1. )

ground into paste
4 small red onions
1 clove garlic
2 cm galangal (lengkuas)
1 stalk lemongrass (white part only)

Method: 
  1. Combine all the ingredients above, except the oil & cornflour mixture, & mix thoroughly. Leave to marinate in the fridge for 1 hour. 
  2. After 1 hour, heat up the oil in a frying pan. Add in the meat mixture & stir frequently. If the mixture is too dry, add some water. Once it's cooked, pour in the cornflour mixture & stir well. Transfer the cooked filling into a colander to drain any excess liquid. Leave to cool before wrapping in the dough.
ASSEMBLY
  1. After the first proofing, divide the dough into small pieces & form into small balls. I divided mine into 19 pieces of 30g each. 
  2. Roll out each ball into a dics & spoon filling. Wrap & seal the dough. Place onto a baking pan lined with baking paper. Do the same with the rest. Leave to proof for about 30 minutes.
  3. Once proofed, apply egg wash on the buns & bake for about 15 minutes, in a preheated oven at 190 deg C, or until they turn golden brown.
Notes & modifications:
  1. I find the filling quite dry. Some of it though was so watery that I had difficulty sealing the dough. So I suggest you add the cornflour & water mixture to produce moist filling.
  2. For the drawing on top of bun, I used a mixture of cocoa powder & water to form a paste. Then I used chocolate dipping tool to draw. You can use anything in the kitchen that's suitable for drawing. Apply the egg wash & let it dry a little before drawing. Go to Victoria Bakes to get more amazing ideas to decorate your buns. 

Thursday, 13 November 2014

Chocolate Chip Banana Buttermilk Pancakes

My daughter & I had our breakfast at KFC yesterday. I had my favourite porridge & the daughter ordered KFC's new addition, chocolate banana pancake meal. I took a bite of the pancake & was pleasantly surprised with the banana flavour. I'm not sure if real banana is added... if it's not, then the banana essence must be very good.


This morning, I was inspired to whip up some homemade chocolate banana pancakes. So I searched for a recipe & decided to use one from Food Network. Great recipe indeed... fluffy pancakes & the banana & chocolate combination was spot-on. They were so good, you could just have them on their own. My boy commented that eating them was  like eating pancakes with Nutella! Need I say more?


Chocolate Chip Banana Buttermilk Pancakes

Ingredients:
1 cup flour
1 1/4 teaspoons baking powder (I used double-acting baking powder.)
1/4 teaspoons baking soda
1 tablespoon sugar
1/4 teaspoon salt
3/4 cup buttermilk (I used 3/4 cup milk +1 tsp lemon juice. You may replace lemon juice with vinegar.)
1 large egg
3 tablespoons butter, melted
1/2 teaspoon vanilla essence or paste
1 very ripe medium banana (mashed)
1/4 cup chocolate chips
softened butter or vegetable oil, for cooking the pancakes

Method: 
  1. In a bowl whisk together the flour, baking powder & baking soda. 
  2. In another bowl, whisk together the buttermilk, egg, sugar, salt, melted butter & vanilla. Add in the mashed banana & blend well. Whisk the dry ingredients, including the chocolate chips, into the liquid until well combined. Don't over mix.
  3. Heat a griddle over moderate heat until hot enough to make a drop of water scatter over surface and brush with butter or oil. Working in batches, spoon batter onto griddle to form pancakes and cook until bubbles appear on surface and undersides are golden brown. Flip pancakes with a metal spatula and cook until undersides are golden brown and pancakes are cooked through. Serve warm.
Adapted recipe by Georgia Downard @ Food Network.

Tuesday, 11 November 2014

Meyer Lemon & Buttermilk Cupcake

It's already almost halfway through November & the typical weather for the year-end has begun to show its true colours, literally..... After a hot & humid week, the sky has been quite gloomy for the last few days. I've been under the weather too... fever, hoarse voice, spinning head.... But I'm good, still managed to be up & about doing my things. :)


And one of the things that I managed to do was to bake some cuppies...  As if to brighten up the wet & cloudy days, I decided to bake some Meyer Lemon Cupcakes. Hehe, actually, I wanted to use up the remaining meyer lemons which had been in the fridge for a while. Bought a bag of them from Cold Storage as I was curious with the taste as compared to that of the regular lemons. Just like what I've read, meyer lemon does have a combined taste of lemon & mandarin orange. 


Believe it or not, this is my first time making & tasting lemon curd. As expected, it still retains its tanginess even though sugar & egg yolks are added. I love the tanginess in some food like acar or Mango Pickles, but meyer lemon curd...... maybe it's an acquired taste, it's definitely not love at first taste, haha! The buttermilk cake is good; it's soft & moist with quite loose crumbs & doesn't taste too sweet. The SMBC is great too, that's for sure. Still, the whole combination just doesn't sit well for me. I think  a cupcake has to be creamy, sweet &/or chocolaty. One thing for sure, these cuppies do look bright & sunny!


Meyer Lemon & Buttermilk Cupcakes

Ingredients:
1 1/2 cups all-purpose flour (I used cake flour.)
3/4 tsp baking powder
1/2 tsp baking soda
1/4 tsp salt
1 cup sugar
4 tbsp unsalted butter, at room temperature (I used 65g.)
1 large egg, at room temperature
1/2 tsp vanilla extract
1 cup buttermilk
Meyer Lemon curd (recipe below)
Swiss Meringue Vanilla Buttercream (recipe below)

Method:
  1. Position a rack in the middle of the oven & preheat to 350 deg F (180 deg C). Line a standard 12-cup muffin pan with paper or foil lines.
  2. In a bowl, whisk together the flour, baking powder, baking soda, & salt. In another bowl, using an electric mixer on medium-high speed, beat the sugar & butter together until light & fluffy, 2-3 minutes. Add the egg & vanilla & beat until combined. Add the flour mixture in 3 additions, alternating with the buttermilk in 2 additions, beating on low speed until just combined. Scrape down the sides of the bowl as needed.
  3. Divide the batter evenly among the prepared muffin cups, filling each about 3/4 full. Bake until lightly golden & toothpick inserted in the center of a cupcake comes out clean, 24-25 minutes. Let the cupcakes cool in the pan on a wire rack for 5 minutes. Transfer the cupcakes to the wire rack & let cool completely, about 1 hour.
  4. Using a paring knife, hollow out a 1 1/2-inch round piece about 1 inch deep from the center of each cupcake. Fill each hollow with a generous tablespoon of meyer lemon curd. Frost the filled cupcakes with the buttercream.
Recipe is from Shelly Kaldunski's Cupcakes.
MEYER LEMON CURD

Ingredients:
6 tbsp fresh meyer lemon juice (I used juice from 3 meyer lemons.)
1/2 cup sugar
4 large egg yolks
pinch of salt
4 tbsp unsalted butter, cut into 4 pieces (I used 65g.)
2 tsp finely grated meyer lemon zest

Recipe is adapted from Shelly Kaldunski's Grapefruit / Lime Curd recipe.

Method:
  1. In a heavy-bottomed non-reactive saucepan, whisk together the meyer lemon juice, sugar, egg yolks & salt. Cook the mixture over medium-high heat, whisking constantly & scraping the side of the pan, until the curd is thick enough to coat the back of a spoon, 5-8 minutes Do not let the curd boil as it will turn lumpy. 
  2. Remove the saucepan from the heat. Whisk in the butter, one piece at a time, until smooth. Strain the curd through a fine-mesh sieve into a bowl. Stir in the meyer lemon zest  & cover with plastic wrap, pressing it directly onto the surface of the curd to prevent a skin from forming. Refrigerate until chilled & set, at least 1 hour or for up to 3 days.
SWISS MERINGUE VANILLA BUTTERCREAM

Ingredients:
3 large egg whites
100g granulated sugar
150g unsalted butter, at room temperature
1 tsp pure vanilla paste
pinch of salt

Method:
  1. Combine egg whites, sugar and salt in a heatproof bowl over a pan of simmering water. Whisk frequently, keeping it over the heat, until the mixture is warm & reaches about 70°C and the sugar has dissolved (rub some between your fingers - if it feels grainy, it hasn't dissolved). 
  2. Transfer the mixture to a mixer with a whisk attached & beat on medium-high for about 5 minutes, until stiff peaks have formed & the meringue is shiny & has cooled to room temperature. (You may also place the mixing bowl in a bowl of water while whisking.)
  3. Turn down the speed to medium and start adding small chunks of butter, checking that it has incorporated before adding more. Add in the vanilla paste. Keep beating for about 5 more minutes until the mixture comes together. 
The above recipe is a slightly modified version of the Gula Melaka SMBC that I used for my Pandan Cupcakes. Do refer to Wendy's post for a detailed post on how to prepare Swiss Meringue Buttercream.

Notes & modifications:
  1. If you don't have buttermilk, you may use milk. Just add 1 tbsp lemon juice or vinegar to the milk & wait it out for about 5 minutes before using it.
  2. At first, my lemon curd turned out very runny even after keeping it in the fridge for a day. Afraid that it will start boiling & thinking that it will thicken up after sitting in the fridge, I must have removed the curd from the fire when it was still too runny. So I had to thicken it, & I did that by adding 1 tbsp of cornflour & reheating the curd until it became thick.
  3. The Swiss Meringue Buttercream (SMBC) may be quite a challenge to prepare especially for the newbies, so I really recommend that you take a look at Wendy's SMBC post for a detailed step-by-step tutorial.
  4. The filled & frosted cupcakes can be refrigerated in an airtight container for up to 3 days. Bring to room temperature before finishing.
I'm linking this post to the events Cook-Your-Books, no. 18 hosted by Joyce of Kitchen Flavours and "My Treasured Recipes #3 - Taste of Autumn (Oct/Nov 2014)" hosted by Miss B of Everybody Eats Well In Flanders and co-hosted by Charmaine of Mimi Bakery House.

Thursday, 6 November 2014

Kuih Peria

I bet some of you really thought that the picture that I shared on Instagram & FB page two days ago was really that of real bitter gourds. Since I labelled the picture as 'sweet bitter gourd',  two of my friends thought that there was really a sweet bitter gourd variety... hehe. 


They are actually Kuih Peria or what the Indonesians call Kuih Perape.  Sweet & rich, they are quite similar to Kuih Angku, except they're shaped to look like bitter gourd & the filling is sweet grated coconut instead of mung bean paste. They really taste like Kuih Koci. I find them quite cute & if you were to serve them for a gathering, I'm sure it'll be an interesting topic of discussion!


Kuih Peria a.k.a. Kuih Perape
Ingredients:
250g glutinous rice flour
1 tbsp limewater (air kapur)
1/4 tsp salt
175 ml thick coconut milk from 1/2 coconut (I used 240ml.)
50 ml pandan juice
4 drops green colour
filling (recipe below)
coconut milk wash (see below)
banana leaves (cut into rectangles of about 5x2.5 cm)

Method:
  1. Combine limewater, salt, pandan juice & colouring & mix well. Pour into the flour. Add in coconut milk & mix thoroughly to form a smooth & soft dough.
  2. Take some dough (I weighed 25g.) Spoon a teaspoon of filling onto the dough & seal. Roll the dough gently between palms till round. Then roll it to form an oval. Using the thumb & forefinger, gently pinch the two ends of the oval dough. Then, use  the  blunt edge of a knife & press some lines to create the 'bitter gourd'. Place the kuih on a piece of  banana leaf which has been lightly greased with oil. Brush the top of kuih with some coconut milk wash. 
  3. Do the same with the rest of the dough. Steam for about 15 minutes. Then brush the cooked kuih with the coconut milk wash again before serving.

FILLING
50 ml water
75g gula Melaka (chopped)
15g granulated sugar
100g freshly grated coconut
1 pandan leaf
1/8 tsp salt
     Combine water, gula Melaka, granulated sugar into a saucepan & boil the mixture. Strain & pour back into the saucepan. Add in coconut, pandan leaf & salt. Stir until cooked & almost dry. Set aside to cool.

COCONUT MILK WASH
50 ml coconut milk
1/8 tsp salt
     Combine both ingredients in a saucepan & cook over low fire, stirring frequently, until it starts to boil. Set aside to cool.

Makes 20 pieces.
Recipe from Sedap Magazine (October 2014).

Notes & modifications:
  1. Since I used freshly-squeezed coconut milk, I cooked it over medium low fire, stirring frequently, until it starts to boil. I used 125ml thick coconut milk (squeezed without water) & added some water & boiled it to get 240ml. If you are using coconut milk from the box, I don't think you need to cook it. Just mix some with water.
  2. I had to add more liquid (65 ml more) to the dough because my dough was quite dry. Please adjust the liquid accordingly. The dough should be smooth & moderately soft.
  3. To prepare pandan juice, take a big bunch of pandan leaves (10-20), blend with some water & strain, preferably with a cheese cloth.