Pages

Wednesday, 17 December 2014

Serimuka or Puteri Salat Batik

Last Saturday, my siblings & their families gathered for dinner at my place, & for dessert, I decided to make an all-time favourite kuih, Putri Salat aka Serimuka. This time,  I decided to use the recipe shared by Ayu. This recipe uses both white & black glutinous as the base which I think is interesting. For the custard layer, I also did what my mum usually does whenever she makes her putri salat, I added some spices to enhance the flavour & fragrance..... 


Initially, I wanted to make just half the recipe as I was afraid that we would have to keep eating the kuih for the rest of the week. I'm glad I decided to go for the whole recipe. The kuih was a big hit... the siblings even asked some for tapau... heheThere was some left, so I served it to my aunts & cousins who dropped by on Sunday. They gladly cleaned up the plate... as a cousin commented, "Sedap eh kuih ni...." (This kuih is so good eh...) Haha! Seriously, this kuih is really sedap! Thank you Ayu for sharing this & many other delicious kuih recipes! 


Serimuka or Puteri Salat Batik

BOTTOM LAYER
Ingredients:
100g black glutinous rice
400g white glutinous rice
300 ml thick coconut milk
1 tbsp sugar
1tsp salt
250 ml water (I only used about 100ml.)
2 pandan leaves (torn lengthwise)

Method:
  1. Wash the black glutinous rice. Drain & place it in a container. Pour some water until about 3 cm above the rice. Leave aside to soak for at least 3 hours. Separately, wash the white glutinous rice & place it in another container. Pour some water until about 3 cm above the rice. Leave aside to soak for at least 3 hours. 
  2. Pour the black rice & water into a pot & cook until it's soft. Stir frequently to prevent burning. If the water dries up while the rice is still not cooked, add more water & continue cooking. Once cooked, remove from fire & drain the water. Set aside.
  3. Prepare a steamer & heat it up on medium-low fire.
  4. Line a 9x9-inch pan (The original recipe uses 10x10-inch pan.) with plastic or silicone paper. Combine the white glutinous rice, coconut milk, sugar & salt in the lined pan. Then pour the water until the rice is just covered, about 2 mm above the rice. So, you need NOT use all the 250ml water. I only used about 100ml. Stir the mixture, throw in the pandan leaves & steam for about 30 minutes or until cooked. (At this point, you may start mixing the top layer.)
  5. Remove the pan from the steamer. Pick out the pandan leaves & stir the cooked white rice for a bit. Mix in the black rice & press it down with a lapis legit presser or the back of a metal spoon. Ensure that the rice layer is very compact, especially around the edges and corners. Place the pan into the steamer & continue steaming it on medium-low fire. Top up the water in it if necessary. (At this point, you may start cooking the top layer.)

TOP LAYER
Ingredients:
A
250g castor sugar
100g custard flour (I used cornflour.)
400 ml thick coconut milk
400 ml water
10-20 pandan leaves (mash with some water using a mortar and pestle or blend with part or all of the 400ml water above.)
1 tsp fennel seeds (crushed)
5 cardamom pods (crush the seeds)

B
4 eggs
1/2 tsp fine salt
green & yellow colouring (The original recipe uses only green.)

Method:
  1. Combine ingredients A in a bowl & mix with a hand whisk, making sure the sugar has dissolved. Add in ingredients B & continue mixing until well blended,  
  2. Strain the mixture, preferably using a cheesecloth, into a pot. Cook on low fire until the mixture starts to thicken, about 3 minutes. 
  3. Very gently, pour the custard onto the rice layer & steam for about 30 minutes on low fire.
  4. Remove from the steamer & allow to cool completely for about 4-6 hours. Cut using a plastic knife.
Notes & modifications:
  1. The original recipe does not use fennel seeds & cardamom. You may omit them & just stick to the pandan leaves. The original recipe also added 1/2 tsp of pandan essence.
  2. Start preparing the top layer once you have placed the white rice in the steamer (step 4 for bottom layer) but, do not cook the custard (step 2 for the top layer) until you have pressed the rice & placed the pan in the steamer (step 5 for bottom layer).
  3. You may wrap the steamer cover with a large towel to catch any condensation which might otherwise drip onto the surface of the kuih. I didn't do this. I just dabbed the surface with a kitchen paper towel. You may also use a damp kitchen towel.
Adapted from Curlybabe's Satisfaction. 
Original recipe by Chef Asma.

Friday, 5 December 2014

Pandan Cupcakes with Gula Melaka Frosting

As I've mentioned yesterday, I made a couple dozens of pandan cupcakes with gula Melaka frosting for my aunt last week. She had seen my post & requested that I made for her family. I used the same recipe that I posted before but this time, I adjusted the amount of granulated sugar & gula Melaka syrup for the frosting. I also made salted gula Melaka caramel & drizzled it on the frosting. 


(UPDATE: Go to this post for the sliced version of this pandan cake.)

Pandan Cupcakes with Gula Melaka Swiss Meringue Buttercream Frosting

PANDAN CUPCAKES

Ingredients:
200g cake flour
1/2 tsp baking powder (double acting)
125g unsalted butter, softened
1/2 tsp salt
1/2 tsp vanilla paste / essence
200g granulated / castor sugar
2 large eggs, at room temperature
75g coconut milk (from a box) + 25g water
2 tbsps pandan juice (refer below)
a few drops of green colouring

Method:
  1. Preheat oven to 180°C. Line muffin pan with cupcake liner or, if using cupcake paper cups, place cups onto a baking pan.
  2. Combine flour & baking power. Sift & set aside.
  3. Combine coconut milk, water, pandan juice & colouring. Mix & set aside.
  4. In a large bowl, on medium speed of an electric mixer, combine butter, vanilla & salt. Cream until smooth.
  5. Add sugar gradually and beat until fluffy, about 3 minutes.
  6. Add in eggs, one at a time, beating well after each addition.
  7. Add the dry ingredients in three parts, alternating with the coconut milk mixture. With each addition, beat until the ingredients are incorporated, taking care not to over beat.
  8. Fill paper cups or muffin pan with batter, 3/4 full.
  9. Place baking or muffin pan on the middle rack of the oven & bake for about 25 minutes.
  10. Cool cakes completely on a wire rack before icing.
GULA MELAKA SWISS MERINGUE BUTTERCREAM FROSTING

Ingredients:
50g gula Melaka, crushed
2 pandan leaves, torn lengthwise & tied a knot
1/8 cup water

3 large egg whites
60g granulated sugar (Reduced from 110g in original recipe.)
150g unsalted butter, at room temperature
1 tsp pure vanilla paste
1/4 tsp salt

Method:
  1. To prepare gula Melaka syrup, combine water, gula Melaka & pandan leaves in a heavy-based saucepan over medium low heat. Stir until all the sugar has melted. Then continue heating up the syrup & let it reduce slightly, about 3-4 minutes. Remove from heat, strain & leave aside to cool completely to room temperature. The syrup will thicken as it cools. If it becomes too thick, thin out with a little bit of water before using.
  2. Combine egg whites, sugar and salt in a heatproof bowl over a pan of simmering water. Whisk frequently, keeping it over the heat, until the mixture reaches about 70°C and the sugar has dissolved (rub some between your fingers - if it feels grainy, it hasn't dissolved).
  3. Transfer the mixture to a mixer with a whisk attached and beat on medium-high for about 5 minutes, until stiff peaks have formed and the mixture has cooled to room temperature.
  4. Turn down the speed to medium and start adding small chunks of butter, checking that it has incorporated before adding more. Keep beating until the mixture comes together, this will take about 5 minutes.
  5. With the mixer running, add in the gula Melaka syrup, one teaspoon at a time, beating until well combined between each addition. You need not use all the gula Melaka syrup. Just add enough. (Read note no. 2.)
PANDAN JUICE

Ingredients:
10 pieces mature pandan leaves, washed & torn into 1-inch pieces
2 tbsps water

Method:
      With a mortar and pestle or a blender, combine the leaves & water & mash into a paste. Press through a fine sieve or squeeze through cheesecloth to extract the green juice only. Let it sit for a while. The green extract will settle at the bottom. I used 2 tbsps of the extract.
SALTED GULA MELAKA CARAMEL (To drizzle on the frosting.)
Ingredients:
50g gula Melaka
1 tbsp water
15g salted butter
30 ml whip cream
1/4 tsp salt

Method:
  1. Combine gula Melaka & water in a saucepan cook until the gula Melaka has melted. Remove from fire & strain the mixture. Rinse the saucepan & pour back the strained gula Melaka syrup into the saucepan. 
  2. Stir the butter into the syrup until it is completely melted, about 1-2 minutes.
  3. Drizzle in whip cream while whisking & allow the mixture to boil. 
  4. Remove from heat and stir in salt. Allow to cool down before using.
Notes & modifications:
  1. This recipe makes about 12 standard size cupcakes. I don't remember the exact number & I didn't record it. Sorry about that.
  2. This time, I reduced the amount of granulated sugar used for the frosting & used more gula Melaka syrup.
  3. I wanted to experiment using salted gula Melaka caramel instead of gula Melaka syrup for the frosting. After adding a few tablespoons of  the caramel, I found the frosting lacked the gula Melaka oomph. The frosting had the gula Melaka intensity only after I added the gula Melaka syrup. So I would advice you to just use the syrup for the frosting & reserve the salted caramel for drizzling on the frosting.

Thursday, 4 December 2014

Red Velvet Cupcakes

These RVC were baked at the request of a friend for her housewarming gathering... Yes, I've started taking orders for my cupcakes. Actually, the first was a few days before this... an aunt wanted a couple dozens of pandan cupcakes with gula Melaka frosting for her  family.


There are so many red velvet recipes out there & I've baked & blogged about a few... This time, I used a recipe from McCormick, as recommended by Rima. It's different in that instead of using buttermilk, it uses sour cream. The cake is so good & moist, you can really eat it on its own!


I'm happy my friend & her guests love the cuppies.  I was worried that she might find the frosting too sour as I had reduced the sugar drastically, but she said it was just nice... So, all RVC lovers out there, go bake these & enjoy them with your love ones!


Red Velvet Cupcakes

CUPCAKES
Ingredients:
1 1/4 cups (170g) flour - I used cake flour.
1/4 cup (24g) unsweetened cocoa powder - I used Valrhona.
1/2 teaspoon baking soda
1/2 teaspoon salt
1/2 cup (I used 125g) butter, softened - I used unsalted butter.
1 cup (212g) granulated sugar
2 eggs
1/2 cup yogurt - Original recipe uses sour cream.
1/4 cup milk
2 tsp red colour - I used Star Brand artificial cochineal red colour. The original recipe uses 1/2 bottle (1/2 ounce) McCormick Red Food Colour.
1 tsp pure vanilla extract

Method:
  1. Preheat oven to 180 deg C. Line cupcake pans with cupcake liners.
  2. Mix flour, cocoa powder, baking soda and salt in medium bowl. Set aside.
  3. Beat butter and granulated sugar in large bowl with electric mixer on medium speed 5 minutes or until light and fluffy. Beat in eggs, one at a time. Mix in yogurt, milk, food colour and vanilla. Gradually beat in flour mixture on low speed until just blended. Do not overbeat.
  4. Spoon batter into 18 paper-lined standard cake cups, filling each cup 2/3 full.
  5. Bake 20 minutes or until toothpick inserted into cupcake comes out clean. Cool in pans on wire rack for 5 minutes. Remove from pans & allow to  cool completely.
VANILLA CREAM CHEESE FROSTING
Ingredients:
1 package (250g) cream cheese, softened
1/4 cup (60g) butter, softened - I used unsalted.
1/2 tsp salt (I added.)
2 tbsps whip cream - Original recipe uses sour cream.
2 tsps pure vanilla extract
1/2 cup (72g) powder sugar - The original recipe uses 16 ounces (454g) confectioners’ sugar

Method:
  1. Beat cream cheese, butter & vanilla in large bowl until light and fluffy. Beat in whip cream.
  2. Gradually beat in sugar until smooth. 
  3. Frost cooled cupcakes with frosting.
Makes 18 standard cupcakes.
Recipe adapted from McCormick.

Notes & modifications:
  1. The cupcake recipe above is half the original recipe. The cream cheese frosting,  on the other hand, is the full recipe & I still had a little bit more left after frosting all the 18 cakes.
  2. I had reduced the sugar for the frosting drastically as I thought the sweetness was just enough, my friend thought it was ok too. But my sis thought the frosting was sour. So, you need to adjust the sugar level to your liking.

Wednesday, 19 November 2014

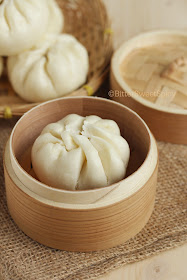
Satay Pau

Yesterday, I posted my Satay Buns entry.  This morning, I'm posting another satay-based finger food, Satay Pau. I used the same satay filling recipe & the dough recipe was one which I got from a weekend class more than ten years ago. I've not used this recipe for many years. At first, I wanted to try the recipe used by Victoria, but hers involves 3 days of preparation. For me, that really needs a lot of planning. So I decided to use this recipe which just required 2 days of preparation. Even then, I had to throw the first starter dough after it was left to ferment for more than 24 hours as I had to make an unscheduled trip to Johor to attend my hubby's uncle's funeral.


The idea to use satay filling came after eating satay pau I bought in Malaysia recently. I love the combination, but the satay filling was too sweet to my liking. I know satay is supposed to taste sweet, but that was just too sweet. For this homemade pau, I decided to use my mum's satay recipe. This time, the filling is more moist than the one I made for my satay buns after adding some cornflour & water mixture. The dough is good too. The pau is soft & fluffy although denser than the commercial ones. Still, I like it a lot. The next pau recipe I'm going to try will be the one Victoria used, with chicken filling, of course.


Satay Pau

DOUGH
Starter
Ingredients:
140g Hong Kong flour
1/4 tsp double-acting baking powder
90g water
1/4 tsp instant yeast
Combine all the ingredients in a bowl & mix until well blended.  Cover & leave in room temperature to ferment for at least 16 hours, up to 24 hours.

Final Dough
Ingredients:
1 quantity of the above starter dough
200g Hong Kong flour
2 tsp double-acting baking powder
1/4 tsp ammonia (The one I bought from Phoon Huat is labelled as ammonium bicarbonate.)
85g fine sugar
45g tap water
1/4 tsp lye water or vinegar (I used vinegar.)
13g vegetable shortening (I used Crisco.)

Method:
  1. Combine flour, baking powder & ammonia & sift in a mixing bowl.
  2. Add in the starter dough, sugar, tap water & lye water or vinegar. Mix until just combined.
  3. Add in the vegetable shortening & continue mixing until well combined & a soft dough is formed. (I mixed it using my mixer using the dough hook for about 10 minutes.) Leave dough to rest for about 15 minutes.
  4. Divide rested dough into small balls. (I divided mine into 18 balls of 30g each.) Roll each dough into a disc. Spoon filling & pleat. Place the pau onto a piece of parchment paper. (I place each pau onto a small paper cupcake liner which has been flattened.) Do  the same with the rest of dough.  Steam on very high fire for about 15 minutes. (You DO NOT need to leave buns to proof before steaming.)
Recipe by Hamidah Rusdi, with some minor modifications.


BEEF SATAY FILLING
Ingredients:
200g ground beef
1 1/2 tbsp ground coriander seeds
1 1/2 tsp ground cumin
1/4 tsp tumeric powder
1/2 tsp salt (adjust to taste)
3 tbsp very dark brown sugar  - adjust amount based on your preference
1/8 cup ground toasted peanuts
1 tbsp tamarind juice
1 tbsp cooking oil
1tbsp cornflour + 3 tbsp water 

ground into paste
4 small red onions
1 clove garlic
2 cm galangal (lengkuas)
1 stalk lemongrass (white part only)

Method:
  1. Combine all the ingredients above, except oil & cornflour mixture, & mix thoroughly. Leave to marinate in the fridge for 1 hour. 
  2. After 1 hour, heat up the oil in a frying pan. Add in the meat mixture & stir frequently until it's cooked. (If the mixture is too dry when cooking, add some water.) Pour in the cornflour mixture & stir well. Transfer the cooked filling into a colander to drain any excess liquid. Leave to cool before wrapping in the dough.

Tuesday, 18 November 2014

Satay Buns

I've seen many bloggers baking soft buns, the kind that we Asians like. One of the recipes that has been making its rounds is the Kopitiam Milk Buns that was shared by Sonia. Besides the plain version, she also made use of this recipe to make some curry buns


Her curry buns inspired me to bake some filled buns. But I decided to fill mine with beef satay filling. No wonder this bun recipe is so popular. The bun is so soft &, more importantly, it is so fragrant & so delicious! Big thumbs up for this recipe! And the satay filling just makes these buns so irresistible!!


I was also inspired to decorate my buns by one & only Victoria. If you had been following her, you would have seen how she has been showcasing her creativity in her baking products. I can't draw well, so  nobody could figure out that I had drawn some sticks of satay on my buns. They all thought that they were some flowers or wheat! ^_^ 


DOUGH
Overnight sponge dough:
215g high protein flour
125g full cream milk (cold) - I used 135g.
2g instant yeast (1/2 tsp)
Mix all ingredients in a bowl till a rough dough is formed. Cover the bowl with cling wrap and store in the fridge overnight.

Basic dough:
1 quantity of above overnight sponge dough
90g high protein flour
12g milk powder (Sonia didn't use.)
30g egg (1/2 large egg)
4g instant yeast (1tsp)
3g fine salt (1/2 tsp)
60g sugar
45g butter (room temperature) - I used only 30g.
1tbsp milk (cold)
for egg wash, combine 1/2 egg & 1/2 tsp of milk

Method:
  1. Tear the overnight sponge dough into pieces into a mixing bowl. Add in the rest of ingredients, except butter, & knead till a smooth dough is formed. 
  2. Add in butter and knead until dough is smooth, shiny and elastic. (I mixed mine using the electric mixer [dough hook] for about 10 minutes in all.)
  3. Cover the bowl with cling film and set aside to proof till double in size for 45-60 minutes. (I poured the dough onto a floured working surface & mould it into a smooth round. Then I covered it with the unwashed bowl that I used for mixing.)
Source: Sonia @ Nasi Lemak Lover.

BEEF SATAY FILLING
Ingredients:
200g ground beef
1 1/2 tbsp ground coriander seeds
1 1/2 tsp ground cumin
1/4 tsp tumeric powder
1/2 tsp salt (adjust to taste)
3 tbsp very dark brown sugar  - adjust based on your preference
1/8 cup ground toasted peanuts
1 tbsp tamarind juice 
1 tbsp cooking oil
1tbsp cornflour + 3 tbsp water (I didn't use this. Refer to note no. 1. )

ground into paste
4 small red onions
1 clove garlic
2 cm galangal (lengkuas)
1 stalk lemongrass (white part only)

Method: 
  1. Combine all the ingredients above, except the oil & cornflour mixture, & mix thoroughly. Leave to marinate in the fridge for 1 hour. 
  2. After 1 hour, heat up the oil in a frying pan. Add in the meat mixture & stir frequently. If the mixture is too dry, add some water. Once it's cooked, pour in the cornflour mixture & stir well. Transfer the cooked filling into a colander to drain any excess liquid. Leave to cool before wrapping in the dough.
ASSEMBLY
  1. After the first proofing, divide the dough into small pieces & form into small balls. I divided mine into 19 pieces of 30g each. 
  2. Roll out each ball into a dics & spoon filling. Wrap & seal the dough. Place onto a baking pan lined with baking paper. Do the same with the rest. Leave to proof for about 30 minutes.
  3. Once proofed, apply egg wash on the buns & bake for about 15 minutes, in a preheated oven at 190 deg C, or until they turn golden brown.
Notes & modifications:
  1. I find the filling quite dry. Some of it though was so watery that I had difficulty sealing the dough. So I suggest you add the cornflour & water mixture to produce moist filling.
  2. For the drawing on top of bun, I used a mixture of cocoa powder & water to form a paste. Then I used chocolate dipping tool to draw. You can use anything in the kitchen that's suitable for drawing. Apply the egg wash & let it dry a little before drawing. Go to Victoria Bakes to get more amazing ideas to decorate your buns. 

Thursday, 13 November 2014

Chocolate Chip Banana Buttermilk Pancakes

My daughter & I had our breakfast at KFC yesterday. I had my favourite porridge & the daughter ordered KFC's new addition, chocolate banana pancake meal. I took a bite of the pancake & was pleasantly surprised with the banana flavour. I'm not sure if real banana is added... if it's not, then the banana essence must be very good.


This morning, I was inspired to whip up some homemade chocolate banana pancakes. So I searched for a recipe & decided to use one from Food Network. Great recipe indeed... fluffy pancakes & the banana & chocolate combination was spot-on. They were so good, you could just have them on their own. My boy commented that eating them was  like eating pancakes with Nutella! Need I say more?


Chocolate Chip Banana Buttermilk Pancakes

Ingredients:
1 cup flour
1 1/4 teaspoons baking powder (I used double-acting baking powder.)
1/4 teaspoons baking soda
1 tablespoon sugar
1/4 teaspoon salt
3/4 cup buttermilk (I used 3/4 cup milk +1 tsp lemon juice. You may replace lemon juice with vinegar.)
1 large egg
3 tablespoons butter, melted
1/2 teaspoon vanilla essence or paste
1 very ripe medium banana (mashed)
1/4 cup chocolate chips
softened butter or vegetable oil, for cooking the pancakes

Method: 
  1. In a bowl whisk together the flour, baking powder & baking soda. 
  2. In another bowl, whisk together the buttermilk, egg, sugar, salt, melted butter & vanilla. Add in the mashed banana & blend well. Whisk the dry ingredients, including the chocolate chips, into the liquid until well combined. Don't over mix.
  3. Heat a griddle over moderate heat until hot enough to make a drop of water scatter over surface and brush with butter or oil. Working in batches, spoon batter onto griddle to form pancakes and cook until bubbles appear on surface and undersides are golden brown. Flip pancakes with a metal spatula and cook until undersides are golden brown and pancakes are cooked through. Serve warm.
Adapted recipe by Georgia Downard @ Food Network.

Tuesday, 11 November 2014

Meyer Lemon & Buttermilk Cupcake

It's already almost halfway through November & the typical weather for the year-end has begun to show its true colours, literally..... After a hot & humid week, the sky has been quite gloomy for the last few days. I've been under the weather too... fever, hoarse voice, spinning head.... But I'm good, still managed to be up & about doing my things. :)


And one of the things that I managed to do was to bake some cuppies...  As if to brighten up the wet & cloudy days, I decided to bake some Meyer Lemon Cupcakes. Hehe, actually, I wanted to use up the remaining meyer lemons which had been in the fridge for a while. Bought a bag of them from Cold Storage as I was curious with the taste as compared to that of the regular lemons. Just like what I've read, meyer lemon does have a combined taste of lemon & mandarin orange. 


Believe it or not, this is my first time making & tasting lemon curd. As expected, it still retains its tanginess even though sugar & egg yolks are added. I love the tanginess in some food like acar or Mango Pickles, but meyer lemon curd...... maybe it's an acquired taste, it's definitely not love at first taste, haha! The buttermilk cake is good; it's soft & moist with quite loose crumbs & doesn't taste too sweet. The SMBC is great too, that's for sure. Still, the whole combination just doesn't sit well for me. I think  a cupcake has to be creamy, sweet &/or chocolaty. One thing for sure, these cuppies do look bright & sunny!


Meyer Lemon & Buttermilk Cupcakes

Ingredients:
1 1/2 cups all-purpose flour (I used cake flour.)
3/4 tsp baking powder
1/2 tsp baking soda
1/4 tsp salt
1 cup sugar
4 tbsp unsalted butter, at room temperature (I used 65g.)
1 large egg, at room temperature
1/2 tsp vanilla extract
1 cup buttermilk
Meyer Lemon curd (recipe below)
Swiss Meringue Vanilla Buttercream (recipe below)

Method:
  1. Position a rack in the middle of the oven & preheat to 350 deg F (180 deg C). Line a standard 12-cup muffin pan with paper or foil lines.
  2. In a bowl, whisk together the flour, baking powder, baking soda, & salt. In another bowl, using an electric mixer on medium-high speed, beat the sugar & butter together until light & fluffy, 2-3 minutes. Add the egg & vanilla & beat until combined. Add the flour mixture in 3 additions, alternating with the buttermilk in 2 additions, beating on low speed until just combined. Scrape down the sides of the bowl as needed.
  3. Divide the batter evenly among the prepared muffin cups, filling each about 3/4 full. Bake until lightly golden & toothpick inserted in the center of a cupcake comes out clean, 24-25 minutes. Let the cupcakes cool in the pan on a wire rack for 5 minutes. Transfer the cupcakes to the wire rack & let cool completely, about 1 hour.
  4. Using a paring knife, hollow out a 1 1/2-inch round piece about 1 inch deep from the center of each cupcake. Fill each hollow with a generous tablespoon of meyer lemon curd. Frost the filled cupcakes with the buttercream.
Recipe is from Shelly Kaldunski's Cupcakes.
MEYER LEMON CURD

Ingredients:
6 tbsp fresh meyer lemon juice (I used juice from 3 meyer lemons.)
1/2 cup sugar
4 large egg yolks
pinch of salt
4 tbsp unsalted butter, cut into 4 pieces (I used 65g.)
2 tsp finely grated meyer lemon zest

Recipe is adapted from Shelly Kaldunski's Grapefruit / Lime Curd recipe.

Method:
  1. In a heavy-bottomed non-reactive saucepan, whisk together the meyer lemon juice, sugar, egg yolks & salt. Cook the mixture over medium-high heat, whisking constantly & scraping the side of the pan, until the curd is thick enough to coat the back of a spoon, 5-8 minutes Do not let the curd boil as it will turn lumpy. 
  2. Remove the saucepan from the heat. Whisk in the butter, one piece at a time, until smooth. Strain the curd through a fine-mesh sieve into a bowl. Stir in the meyer lemon zest  & cover with plastic wrap, pressing it directly onto the surface of the curd to prevent a skin from forming. Refrigerate until chilled & set, at least 1 hour or for up to 3 days.
SWISS MERINGUE VANILLA BUTTERCREAM

Ingredients:
3 large egg whites
100g granulated sugar
150g unsalted butter, at room temperature
1 tsp pure vanilla paste
pinch of salt

Method:
  1. Combine egg whites, sugar and salt in a heatproof bowl over a pan of simmering water. Whisk frequently, keeping it over the heat, until the mixture is warm & reaches about 70°C and the sugar has dissolved (rub some between your fingers - if it feels grainy, it hasn't dissolved). 
  2. Transfer the mixture to a mixer with a whisk attached & beat on medium-high for about 5 minutes, until stiff peaks have formed & the meringue is shiny & has cooled to room temperature. (You may also place the mixing bowl in a bowl of water while whisking.)
  3. Turn down the speed to medium and start adding small chunks of butter, checking that it has incorporated before adding more. Add in the vanilla paste. Keep beating for about 5 more minutes until the mixture comes together. 
The above recipe is a slightly modified version of the Gula Melaka SMBC that I used for my Pandan Cupcakes. Do refer to Wendy's post for a detailed post on how to prepare Swiss Meringue Buttercream.

Notes & modifications:
  1. If you don't have buttermilk, you may use milk. Just add 1 tbsp lemon juice or vinegar to the milk & wait it out for about 5 minutes before using it.
  2. At first, my lemon curd turned out very runny even after keeping it in the fridge for a day. Afraid that it will start boiling & thinking that it will thicken up after sitting in the fridge, I must have removed the curd from the fire when it was still too runny. So I had to thicken it, & I did that by adding 1 tbsp of cornflour & reheating the curd until it became thick.
  3. The Swiss Meringue Buttercream (SMBC) may be quite a challenge to prepare especially for the newbies, so I really recommend that you take a look at Wendy's SMBC post for a detailed step-by-step tutorial.
  4. The filled & frosted cupcakes can be refrigerated in an airtight container for up to 3 days. Bring to room temperature before finishing.
I'm linking this post to the events Cook-Your-Books, no. 18 hosted by Joyce of Kitchen Flavours and "My Treasured Recipes #3 - Taste of Autumn (Oct/Nov 2014)" hosted by Miss B of Everybody Eats Well In Flanders and co-hosted by Charmaine of Mimi Bakery House.

Thursday, 6 November 2014

Kuih Peria

I bet some of you really thought that the picture that I shared on Instagram & FB page two days ago was really that of real bitter gourds. Since I labelled the picture as 'sweet bitter gourd',  two of my friends thought that there was really a sweet bitter gourd variety... hehe. 


They are actually Kuih Peria or what the Indonesians call Kuih Perape.  Sweet & rich, they are quite similar to Kuih Angku, except they're shaped to look like bitter gourd & the filling is sweet grated coconut instead of mung bean paste. They really taste like Kuih Koci. I find them quite cute & if you were to serve them for a gathering, I'm sure it'll be an interesting topic of discussion!


Kuih Peria a.k.a. Kuih Perape
Ingredients:
250g glutinous rice flour
1 tbsp limewater (air kapur)
1/4 tsp salt
175 ml thick coconut milk from 1/2 coconut (I used 240ml.)
50 ml pandan juice
4 drops green colour
filling (recipe below)
coconut milk wash (see below)
banana leaves (cut into rectangles of about 5x2.5 cm)

Method:
  1. Combine limewater, salt, pandan juice & colouring & mix well. Pour into the flour. Add in coconut milk & mix thoroughly to form a smooth & soft dough.
  2. Take some dough (I weighed 25g.) Spoon a teaspoon of filling onto the dough & seal. Roll the dough gently between palms till round. Then roll it to form an oval. Using the thumb & forefinger, gently pinch the two ends of the oval dough. Then, use  the  blunt edge of a knife & press some lines to create the 'bitter gourd'. Place the kuih on a piece of  banana leaf which has been lightly greased with oil. Brush the top of kuih with some coconut milk wash. 
  3. Do the same with the rest of the dough. Steam for about 15 minutes. Then brush the cooked kuih with the coconut milk wash again before serving.

FILLING
50 ml water
75g gula Melaka (chopped)
15g granulated sugar
100g freshly grated coconut
1 pandan leaf
1/8 tsp salt
     Combine water, gula Melaka, granulated sugar into a saucepan & boil the mixture. Strain & pour back into the saucepan. Add in coconut, pandan leaf & salt. Stir until cooked & almost dry. Set aside to cool.

COCONUT MILK WASH
50 ml coconut milk
1/8 tsp salt
     Combine both ingredients in a saucepan & cook over low fire, stirring frequently, until it starts to boil. Set aside to cool.

Makes 20 pieces.
Recipe from Sedap Magazine (October 2014).

Notes & modifications:
  1. Since I used freshly-squeezed coconut milk, I cooked it over medium low fire, stirring frequently, until it starts to boil. I used 125ml thick coconut milk (squeezed without water) & added some water & boiled it to get 240ml. If you are using coconut milk from the box, I don't think you need to cook it. Just mix some with water.
  2. I had to add more liquid (65 ml more) to the dough because my dough was quite dry. Please adjust the liquid accordingly. The dough should be smooth & moderately soft.
  3. To prepare pandan juice, take a big bunch of pandan leaves (10-20), blend with some water & strain, preferably with a cheese cloth.

Thursday, 30 October 2014

Swedish Cinnnamon Buns

I've made cinnamon buns many times but they were always the regular buns in which the filled dough is rolled, sliced & baked in a deep baking pan like these. This time, I wanted to try something different, so I did the Swedish way of forming their buns. They are definitely more attractive than the regular buns. Compared to the regular rolls, most part of each Swedish bun is exposed to the direct oven heat. As a result, the bun has more crusty surface & less white, soft & fluffy part. So if you prefer softer & fluffier buns, then the regular rolls would be a better choice.


Here, I used the Kopitiam Milk Bun dough recipe shared by Sonia. This recipe uses quite a bit of full cream milk, so I'm not surprised the buns turned out very flavourful. Besides, it also uses the overnight-dough method, that too adds on to the flavour. Since the buns already taste so good, I ate mind without any frosting. But if you still want your cinnamon buns with cream cheese frosting just like my cinnamon-bun monsters, please refer to my other cinnamon bun posts for the recipe.


I apologise for spamming this post with so many photos. I just love looking at the buns. Besides, I took so many pictures & many of them turned out well. So hope they are enough to motivate you, especially the cinnamon-bun monsters out there, to bake them!


Swedish Cinnnamon Buns

OVERNIGHT SPONGE DOUGH
215g high protein flour
125g full cream milk (cold) - I used 135g.
2g instant yeast (1/2 tsp)
Mix all ingredients in a bowl till a rough dough is formed. Cover the bowl with cling wrap and store in the fridge overnight.

BASIC DOUGH
1 quantity of above overnight sponge dough
90g high protein flour
12g milk powder (Sonia didn't use.)
30g egg (1/2 large egg)
4g instant yeast (1tsp)
3g fine salt (1/2 tsp)
60g sugar
45g butter (room temperature) - I used only 30g.
1tbsp milk (cold)

Method:
  1. Tear the overnight sponge dough into pieces into a mixing bowl. Add in the rest of ingredients, except butter, & knead till a smooth dough is formed. 
  2. Add in butter and knead until dough is smooth, shiny and elastic. (I mixed mine using the electric mixer [dough hook] for about 10 minutes in all.)
  3. Cover the bowl with cling film and set aside to proof till double in size for 45-60 minutes. (I poured the dough onto a floured working surface & mould it into a smooth round. Then I covered it with the unwashed bowl that I used for mixing.)
Source:  Sonia @ Nasi Lemak Lover.

FILLING
butter, softened
cinnamon powder
brown sugar
1 egg - lightly beaten (for egg wash)

TO ASSEMBLE THE CINNAMON BUNS: 
  1. Place the proofed dough onto a floured working surface. Deflate it by punching it down & then shaping the dough into a smooth ball. Leave to rest for 15 minutes.
  2. Roll the dough out into a large rectangle. You want the long sides over twice as long as the short sides. Spread butter over the entire rectangle. Then sprinkle cinnamon powder followed by dark brown sugar.
  3. Fold it into thirds lengthwise. It should measure about 16x8 inch. At this point, you may want to roll out the dough to flatten it a little bit. Cut the roll widthwise  with a sharp knife into 8-10 slices. 
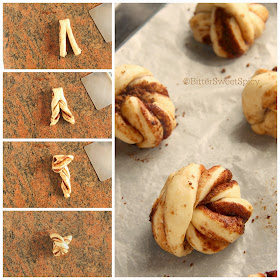
  4. Take a slice of dough & cut it into two almost all the way. Twist the ends of each slice in opposite directions a few times. Lift up the twists in a crisscross manner. Tuck the ends under & seal with a little water if needed. Place the slices onto a  baking sheet which has been lined with silicone paper. Cover and let rise for about 30 minutes.
  5. Preheat the oven to 190 deg C. Brush the proofed buns with the beaten egg. This will give the buns a beautiful golden colour when baked. Bake for about 15-20 minutes or until golden brown. Place the baked rolls on a cooling rack. Serve warm.
Note:
  1. I made the buns twice (& each time 2 recipes!) within a week. The first time,  a recipe produced 8 big pieces as seen in my pictures above. Yesterday, I made 10 buns for each recipe. I like the smaller pieces better.
  2. Please refer to the following pictures & video to better understand the assembly process. The pictures below are taken yesterday when I made 10 buns with 1 recipe.


Tuesday, 28 October 2014

Moroccan Grilled Chicken

My family had Moroccan Grilled Chicken with steam rice & spicy Tom Yum Soup a couple of weekends ago. That was a rare occasion where the preparation of our meals at home does not involve sautéing of spices. The chicken just needed marinating before grilling. The soup was even easier to prepare.... I just dumped a tom yum cube, some fresh prawns & other accompanying ingredients into the pot of water & in just 20 minutes, it's done!


Moroccan Grilled Chicken

Ingredients:
1 (2 kg) chicken, halved
salt
lettuce, torn into large pieces
cucumber, sliced
tomato, sliced
potato, boiled, peeled & sliced
lemon, cut into wedges
mint leaves

Chermoula Spice (finely ground):
3 red chillies
1 tbsp  chilli powder
1 tbsp paprika powder
1 tsp  cumin powder
1  onion
4 cloves garlic
30 g (1/2 cup) coriander leaves / cilantro / Chinese parsley
60ml (1/4 cup) olive oil
juice of 1/2 lemon

Method:
  1. Rub the chicken with salt & chermoula spice & marinate for 3-4 hours in the refrigerator.
  2. Remove the chicken from the refrigerator & let it come to room temperature
  3. Roast the chicken in a 180-deg C preheated oven for 45 minutes, turning it after 20 minutes.
  4. Serve with lettuce, cucumber, tomato, potato, lemon & mint leaves. (We had the chicken with rice instead of potato.)
Recipe by Chef Wan from Simply Sedap!

I'm linking this post to the Cook-Your-Books event no. 17 hosted by Kitchen Flavours.

Friday, 24 October 2014

Pumpkin Kuih Koci

I love Kuih Koci but rarely make it myself. Last Saturday, I made Pumpkin Kuih Koci, a version that's less commonly sold. Although I could not really taste the pumpkin, this Kuih Koci certainly tastes better than the regular ones. The coconut milk sauce added to the dough gives this delighful kuih its rich flavour. The dough needed no added water at all as the moisture from the cooked pumpkin was enough to bind the dough to a soft & addictive kuih. I love the colour too!


Pumpkin Kuih Koci
(Kuih Koci Labu)

DOUGH
150g (1&1/4 cup) glutinous rice flour
280g (1 cup + 2 tbsp) cooked pumpkin – mashed (Original recipe uses only 1 cup.)
salt to taste
banana leaves for wrapping - soften & cut into about 4x4 - inch squares (see note no. 1)
     Combine the flour, pumpkin & salt & mix thoroughly. The dough  is quite sticky. You may add more flour, but don't add too much or the kuih will be hard.

COCONUT MILK SAUCE (DADIH)
1 cup thick coconut milk
1 tsp rice flour
a pinch of salt
Combine & cook on low fire, stirring continuously,  until it starts to boil.

FILLING (my own measurement)
75g (1small piece) gula Melaka
1/2 tbsp granulated sugar
50ml (about 2 tbsp) water
125g (1 cup) freshly-grated coconut
1/2 tbsp rice flour (Chah uses plain flour.)
a pinch of salt
2 pandan leaves (torn)
     Combine gula Melaka, granulated sugar & water in a saucepan & cook until it boils. Remove from fire & strain the syrup. Rinse the saucepan & pour back the gula Melaka syrup. Add in the coconut, rice flour, salt & pandan leaves. Cook over medium fire until mixture is almost dry. Set aside.

ASSEMBLY
  1. To prepare the banana leaves, wash & dry the leaves. Then run one leave at a time on hot electric or gas stove. This will soften the leaves & prevent tearing when wrapping the kuih koci. Then cut the leaves into 4-inch squares.
  2. Take a piece of leave & place some dough onto it. Place some filling & top it with some more dough. Wrap & place it on a steamer. Continue with the rest of dough & filling.
  3. Steam over medium fire for about 20 minutes.
Recipe adapted from Bila Chah Ke Dapur.

Notes:
  1. I steamed 480g raw pumpkin. After removing the seeds & peeling the skin, I was left with 280g of cooked pumpkin.
  2. The dough was quite sticky but I didn't want to add too much flour as I wanted my kuih koci to be soft. Instead of forming the kuih into a ball shape, I found it easier to just spoon the dough onto the leave. You may also oil you palm a little when shaping the dough.
I'm linking this post to the event Little Thumbs Up (Oct 2014 Event: PUMPKIN), organised by Zoe (Bake for Happy Kids) and Mui Mui (My Little Favourite DIY) and hosted by Eileen (Eileen's Diary).