Pages

Tuesday, 31 December 2013

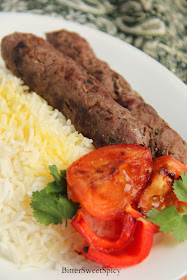
Kabab Koobideh with Chelo

I first tasted Persian food about 15 years ago in Maryland, USA where I used to live. Back then, there were not many halal food outlets in my neighbourhood. The only ones I was aware of were a Chinese Muslim, an Indian & a Persian & the Persian outlet was the nearest to my place. (A few weeks ago, I was just curious, so I googled & apparently, the restaurant, Mediterranean House of Kabob, is still around!) I often went there with my daughters (my only children then) on weekdays after school because there was really no choice for us if we decided to eat out... but we didn't mind because my daughters & I loved the food, so much so, I made sure we dropped by the place for the last time the day before we left the country for good. I also wanted to let the restaurant owner know that we were leaving...


There were a few types of kabob served at the restaurant but our favourite was kabab koobideh (grilled ground meat on skewers) served with rice or pita & cucumber yogurt sauce. And today, we had home-cooked kabab koobideh & chelo (steamed rice, Persian-style). My family loves the kabab & rice. I think adding the sumac to the meat makes a difference as it gives the authentic middle eastern flavour. I bought my sumac powder from Mustaffa a few weeks ago. I'm also amazed by how delicious the chelo is,  although it is basically just white rice with butter. And, if you have not tried grilled tomatoes before, I say you should try it because it is so much better than raw or overcooked tomatoes! 

Before I leave you with the recipes, I 'd like to wish all BitterSweetSpicy readers Happy New Year! Thank you for supporting my blog & FB Page & have a wonderful 2014!


Kabab Koobideh
Adapted from recipes by Fauzia's Kitchen Fun  & Turmeric & Saffron.

Ingredients:
1 kg ground beef (mixture of lean & fat)
1 large onion - grated (squeeze out the juice, if any)
1 small bunch coriander (leaves with stems) - chopped
1 tbsp sumac powder
1 1/2 tsp salt
2 tsp black pepper powder

For Grilled Vegetables:
4 medium firm and ripe tomatoes, cut in halves
2 medium onions, quartered
2 capsicums, sliced

Method:
  1. In a large bowl, combine all the ingredients and mix well with your hands until the mixture becomes well blended. Cover the bowl & leave it in the fridge overnight to ensure that the meat is well marinated.
  2. Divide the mixture into portions (I made 10 portions). Take each portion & shape into an oval. Then place it on a flat and long metal or wooden skewer and press onto the skewer. Do the same with the rest of the portions. (The thickness and the length of the kababs depend on your preferences.)
  3. Heat up the grill (I used a grill pan.), making sure that it is very hot. Then place the skewers on the grill. Turn each skewer over quickly and continue to do so until the meat cooks & turns brown on both sides.
  4. To grill the vegetables, place them directly onto the hot grill or place them on thin metal or wooden skewers and grill for a few minutes.

Chelo
Recipe by Maideh Mazda from In a Persian Kitchen.

Ingredients:
2 1/2 cups rice - I used basmati rice.
1 1/2 tbsp salt
2 litres water
2 tbsp salt

1/2 cup butter (melted)
saffron - mixed with hot water (optional)

Method:
  1. Wash rice three times in lukewarm water & then soak in cold water of which 1 1/2 tbsps of salt have been added. Use enough cold water to cover the rice. This rice should be soaked overnight (in a pinch, 1 or 2 hours' soaking will suffice).
  2. Boil 2 litres of water of which 2 tbsps of salt have been added.
  3. Pour off the water in which the rice has been soaked. Add rice to the boiling water & boil it for 10-15 minute. (Stir rice with spoon once or twice to prevent the grains from sticking together.)
  4. Pour the rice & water into a strainer & rinse with lukewarm water.
  5. Put 1/3 of the melted butter into the bottom of the pot in which you have cooked the rice. Add 2 tbsps of water to the butter in the pot.
  6. take a spoonful of rice at a time & put it in hot pot, distributing it evenly. Allow it to mount into a cone shape.
  7. Pour the rest of the butter (& saffron, if using) over the rice, distributing it evenly.
  8. Put paper towel over the pot. Cover & put 2 or 3 dish towels on the lid. Cook for 10-15 minutes on medium fire.  Lower the fire & cook for 35-40 minutes on low fire. 
Notes:
  1. By putting dish towels over the lid, the rice will cook more evenly throughout.
  2. If the rice is cooked at the right temperature, the rice will form a crust at the bottom of the pot which will become crisp & turn into golden brown, while the rest of the rice remains white. If desired, add more melted butter before serving. 
  3. When serving rice, put 2-3 tablespoons of rice in a dish & add to it 2 tbsps of saffron. Mix it well & decorate the chelo with this rice.
I am submitting this post to Asian Food Fest: West Asia hosted by Shannon from Just As Delish.

Sunday, 29 December 2013

Mdammas a.k.a Kacang Pool

Kacang pool, or mdammas as it's referred to in the Middle East, is one of my favourite dishes. When I was living with my parents, my mother often prepared it for breakfast on Sundays. My mum's version is very simple to prepare. Crushed black pepper is added to the cooked beans & the dish is served with sliced onion & green chilli & sunny side up egg fried with ghee. According to her, that was how kacang pool was prepared & sold by the Arabs during the 1950s & 60s in the Kampong Glam area. In fact, fried egg was not part of the dish! 


Originated in Egypt & Sudan, mdammas is the most popular food in these countries. However, according to  Salah Jamal, the author of  Arabian Flavours, the true masters in the preparation of the most delicious version of this dish are the Arabs of Asia Minor i.e. the Palestinians, Jordanians, Syrians, Lebanese & Iraqis. In his book, Salah Jamal shared 2 recipes of mdammasboth the Egyptian & Sudanese version as well as the Asia Minor version. The former is very simple, just like how my mum often prepared hers, except it uses cayenne pepper instead of black pepper & olive oil instead of ghee. The latter involves the use of more ingredients. I used this recipe when I prepared mdammas for breakfast more than two weeks ago.  


Mdammas a.k.a Kacang Pool
(the Asia Minor version)
Adapted from recipe by Salah Jamal from Arabian Flavours, Recipes & Tales of Arab Life.

Ingredients:
1 can cooked broad beans (fava beans)
1 large clove garlic (crushed)
2 sprigs fresh coriander, chopped (original recipe uses fresh parsley)
juice of 1 lemon
1 tbsp tahina
salt to taste
2 tbsp olive oil
tomato - chopped (I added.)
onion - chopped
green chilli - sliced

Method:

  1. Pour beans into a saucepan & heat up for about 5 minutes. Mash the beans with a folk. (You may also puree it using a blender.)
  2. Add in garlic, coriander, lemon juice, tahina & salt. Mix thoroughly.
  3. Pour mixture into a serving dish. Drizzle olive oil & top it with tomato, onion & green chilli.
  4. Serve with bread.
I am submitting this post to Asian Food Fest: West Asia hosted by Shannon from Just As Delish.
I'm also linking this post to Cook Your Books No. 7 organised by Kitchen Flavours.

Wednesday, 11 December 2013

Turkish Pide

When I first saw Wendy posted her Turkish pita last week, right away I knew I wanted to bake it! In fact, I could so eat it right then! How could I not... the pita looked so beautiful & colourful, and the shape is so unique! Looking through the ingredients, I knew the dish would taste great. I think this dish will make a great & interesting presentation for guests.


The pita was so good that Wendy regretted baking only one piece... I didn't want to have any regrets, so I baked 4! Haha! But that's a good thing because my first two pitas were not presentable enough for picture taking (but still good to eat ^_^), most probably because of the mistake I made with the filling (read notes below). Also, good thing that I made 4 because all my kids loved it. They kept telling me that the crust was really good. I'm thinking of using this pita recipe for my pizza crust. One thing I know for sure, this is one dish I will make again & again.


Notes & modifications:
  1. I made the mistake of mixing the egg together with the rest of the ingredients for the filling, besides cracking an egg on top. As a result, my filling was quite watery after baking. Actually, my kids & I did not really mind the moist filling. The only problem is the liquid did get soak a little into the bread..
  2. Before pinching the dough at the two ends, I applied some water on the edge to ensure the dough was sealed securely. 
  3. I baked my pita on a baking stone which I preheated for 1/2 hour, so I only needed to bake each pita for about 20 minutes.
(Update: I made this again. This time I used the filling recipe by Paul Hollywood. I think it has better flavour. Take a look at the recipe here.)

Mozzarella cheese topping for my youngest...

Turkish Minced Meat Pita
Source: Table for two.... or more.
(Makes 1 large pide.)

Pide dough:
125g flour (I used bread flour.)
20g water + 1/2 tsp instant yeast
20g natural yoghurt
20g milk (I used 30g.)
1 tsp sugar
1 tbsp olive oil
1/4 tsp salt
olive oil for brushing on baked pita

Filling:
100g minced meat
1 tomato, seeds removed, diced
2 tbsp onion
2 tbsp chopped parsley (I used coriander leaves.)
1/4 tsp paprika
1/4 tsp salt
black pepper to taste
1 egg (for topping)

Method:
  1. Dissolve yeast in water. Combine all ingredients for pastry & knead using hand for 2 minutes. Leave to proof (covered) for 2 hours.
  2. 20 minutes before end of proofing, combine all ingredients for  filling, except egg, & place the mixture in a colander to drain any liquid.
  3. Preheat oven at 180 (fan) or 200 deg C.
  4. Roll out dough into an oval, 5mm thick. Place dough on a baking paper which is placed on a dark-coloured baking tray. Put filling on the dough, leaving 1-inch border. Fold the sides in & pinch the ends together. Crack the egg onto the filling.
  5. Bake for 30 minutes, until the dough turns golden brown. Remove pita from oven & brush the crust with olive oil. Serve warm.
I am submitting this post to Asian Food Fest: West Asia hosted by Shannon from Just As Delish.

Monday, 9 December 2013

Maamoul

One of the must-have cookies for Hari Raya (Eid) in Singapore & Malaysia is Kuih Makmur. It's basically butter pastry filled with peanuts. I'm not sure if you are aware that this cookie actually originates from the Middle East region. There, it's called Maamoul & it's also normally served during Eid celebrations. The original Maamoul cookies are filled with dates but now, nuts like pistachios, walnuts or almonds are commonly used.


Today, I made Maamoul cookies that uses a mixture of white flour & semolina. Just like Kuih Makmur, the Maamoul cookies are so addictive! The perfect combination of the slightly crunchy pastry & sweetened pistachio nuts makes this a must-have cookie for the next Hari Raya!


Maamoul
Adapted from recipe by Saad Fayed.

Pastry:
2 cups pastry flour, a.k.a. top flour (You can also use all-purpose flour.) - sifted
1 cup semolina
250g (2 sticks) unsalted butter, softened
1/2 tsp salt
2 tablespoons milk
1/4 teaspoon rose water (The original recipe uses orange blossom water.)
powdered sugar for dusting

Method:
  1. Preheat oven to 180 deg C.
  2. In a medium bowl, combine flour and semolina. Set aside.
  3. In another bowl, beat butter for 30-45 seconds. Stir in milk, salt & rose water. Continue stirring until all the ingredients are well combined.
  4. Slowly add in flour & mix well. 
  5. Take some dough & press it into a cookie mould. Place some nut filling on the dough. Then add more dough on the filling & press to seal. Repeat with remaining dough and nut mixture.
  6. If using aluminium moulds, place the aluminium moulds filled with dough on a baking tray. If using wooden mould, knock the shaped cookie dough out of the mould & arrange the cookies on a baking tray.
  7. Bake maamoul for 20-30 minutes until golden brown.
  8. Cool baked maamoul. If using aluminium moulds, remove cookies from the moulds. 
  9. Dust cookies with sugar powder & store in air-tight container.
Filling:
2/3 cup chopped pistachios (You can also use walnuts or almonds)
2 1/2 tablespoons powdered sugar
3 tbsps butter

Combine all ingredients in a saucepan. Heat up  & stir until the ingredients are well combined & the butter has melted.


I am submitting this post to Asian Food Fest: West Asia hosted by Shannon from Just As Delish.

Thursday, 5 December 2013

Italian Almond Tart

I baked the Italian Almond Tart today.... just couldn't resist baking it after looking at the posts for the current (& ending very soon) Bake Along event. As expected, the tarts looked gorgeous & they got a few of BitterSweetSpicy's FB fans excited! Before that, when the tarts were still in the oven, I was already feeling excited . They were so fragrant.... 
Before the tarts were completely cool, I decided to cut one as I couldn't wait to take a bite. Oh my.... it's so  heavenly.... The combination of the flaky, fragrant tart shell &  moderately rich almond filling makes this tart an excellent dessert!


Notes & modifications:
  1. I made 1 recipe of the dough & only 1/2 recipe of the almond filling. The recipe made four 10cm heart-shape & one 11x6 cm rectangle tart pans, with removable bottom.
  2. For the dough, I added the water last.  I didn't need to add all, just a little. 
  3. The dough was quite sticky, so it was quite challenging to roll out the dough to the pan.
  4. I only spread a thin layer of jam onto my tart shell because I didn't want my almond tart to be too sweet.


Italian Almond Tart
Recipe by Williams-Sonoma.

Ingredients:
1 rolled-out round of tart dough (see recipe below)
125g unsalted butter, at room temperature
250g almond paste, cut into 1-inch cubes (recipe below)
1/4 C sugar
2 eggs
1⁄3 cup unbleached all-purpose flour (I used pastry flour.)
1/3C raspberry, plum or cherry jam
1⁄3 cup sliced almonds

Method:
  1. Fold the dough round in half and carefully transfer to a 9 1/2-inch tart pan, preferably with a removable bottom. Unfold and ease the round into the pan, without stretching it, and pat it firmly into the bottom and up the sides of the pan. Trim off any excess dough by gently running a rolling pin across the top of the pan. Press the dough into the sides to extend it slightly above the rim to offset any shrinkage during baking.
  2. Refrigerate or freeze the tart shell until firm, about 30 minutes. Meanwhile, position a rack in the lower third of an oven and preheat to 375°F.
  3. Line the pastry shell with aluminum foil or parchment paper and fill with pie weights or raw short-grain rice. Bake for 20 minutes, then lift an edge of the foil. If the dough looks wet, continue to bake, checking every 5 minutes, until the dough is pale gold, for a total baking time of 25 to 30 minutes. Transfer to a wire rack.
  4. Position a rack in the middle of the oven and reduce the heat to 350°F. 
  5. In a bowl, using an electric mixer on medium speed or a whisk, beat the butter until smooth. Add the almond paste, one piece at a time, beating until smooth after each addition. While continuing to beat, sprinkle in the sugar. Add the eggs one at a time, beating well after each addition. Stir in the flour. 
  6. Spread the jam evenly over the bottom of the partially baked tart shell. Spoon in the almond paste mixture and spread evenly over the jam. Sprinkle the surface evenly with the sliced almonds. 
  7. Bake the tart until the filling is golden and the middle is firm to the touch, 35 to 45 minutes. Transfer to a wire rack and let the tart cool completely. If using a tart pan with a removable bottom, let the sides fall away, then slide the tart onto a serving plate. Serve at room temperature.
Makes one 9 1/2-inch tart; serves 8.


Almond Paste
Recipe from Joyce. (makes about 250g)

Ingredients:
150gm ground almond
90gm sifted powdered sugar
1 to 1-1/2 tablespoon egg white (adding a little at a time as needed to form a dough)
1/2 tsp almond extract
1/8 tsp salt
Mix everything together and knead to a dough. Use as directed or freeze it.

Basic tart dough
Ingredients:
1 egg yolk
2 Tbs. very cold water (I didn't use all.)
1 tsp. vanilla extract
1 1⁄4 cups unbleached all-purpose flour (I used pastry flour, aka top flour.)
1⁄3 cup sugar
1⁄4 tsp. salt
8 Tbs. (1 stick / 125g) cold unsalted butter, cut into 1⁄4-inch cubes

Directions:
  1. In a small bowl, stir together the egg yolk, water and vanilla; set aside.
  2. To make the dough by hand, in a large bowl, stir together the flour, sugar and salt. Using a pastry cutter or 2 knives, cut the butter into the flour mixture until the texture resembles coarse cornmeal, with butter pieces no larger than small peas. Add the egg mixture and mix with a fork just until the dough pulls together.
  3. To make the dough in a stand mixer fitted with the flat beater, stir together the flour, sugar and salt in the mixer bowl. Add the butter and beat on medium-low speed until the texture resembles coarse cornmeal, with butter pieces no larger than small peas. Add the egg mixture and beat just until the dough pulls together.
  4. Transfer the dough to a work surface, pat into a ball and flatten into a disk. Use the dough immediately, or wrap in plastic wrap and refrigerate until well chilled, about 30 minutes.
  5. To roll out the dough, on a lightly floured board, flatten the disk with 6 to 8 gentle taps of the rolling pin. Lift the dough and give it a quarter turn. Lightly dust the top of the dough or the rolling pin with flour as needed, then roll out until the dough is about 1/8 inch thick. Use a small, sharp knife to cut out a round or rounds 2 inches greater in diameter than your tart or larger tartlet pans. Use a small, sharp knife or a cookie cutter to cut out rounds 1/2 to 1 inch greater in diameter than your miniature tartlet pans. If using a rectangular tart pan, cut out a rectangle 2 inches larger on all sides than the pan. Makes enough dough for one 9 1/2-inch tart, six 4-inch tartlets, twelve 2-inch miniature tartlets or one 13 3/4-by-4 1/4-inch rectangular tart.
I'm linking this post to Bake-Along #55 hosted by Zoe from Bake for Happy Kids, Joyce from Kitchen Flavours and Lena from Frozen Wings.

Monday, 2 December 2013

Roti Prata a.k.a Roti Canai

In today's post, I'll be sharing my experience with making roti prata at home. Before that, let me just share with you my memories of homemade roti prata when I was growing up. 
Back in the days, frozen ready-made prata was non-existent. So there were two ways we could enjoy them, we either bought the freshly-fried prata from the coffee shop or we made them at home. Since eating out was not a norm, it was quite usual for many mothers to make prata at home, including my mum. Like me, anybody from my generation would have likely experienced making prata at home. Even my husband remembers helping his mum to knead the prata dough...


My mother even went one step further. She would add mutton briyani oil (more like briyani spread) to the  prata dough before stretching it. So the prata would have mutton briyani flavour! So yummy!! If you are wondering where the briyani spread comes from, it's actually the oil that floats when preparing mutton briyani dish (not the rice). By the way, my family often cooked Mutton Briyani Rice for thanksgiving feasts, that's where all the oil came from. My mom would  scoop up the oil & keep it. It would solidify into a spread. You must be thinking of  the cholesterol level..... well, back then, the word 'cholesterol' was not part of a layman's vocabulary, probably strictly used by the medical staff only! And, I didn't know anybody who had stroke....


Ok, enough with the nostalgia.... As usual, my mum never measured her ingredients, so I don't have her recipe. So I decided to start out with a tried-&-tested recipe, one by Singapore's very own food blogger, Dr Leslie Tay of ieatishootipost. Dr Tay not only shared his recipe, he also shared his research on the ingredients & the steps involved in making the prata. Do read his post.
I'm very happy with the pratas that I made. They looked & tasted very good. The dough was very easy to handle & none of my stretched dough was torn. However,  I thought my pratas were slightly dry. So the next time I make them, I must remember not to stinge on the oil! 


Notes & modifications:
  1. There were 2 recipes shared by Dr Tay,  an enriched recipe that will produce richer & more tender pratas & another that will result in leaner & crispier pratas. I used the former.
  2. After step 3, according to Dr Tay, the dough should be tacky, mine turned out quite dry as you can see in the picture below. My mum advised me not to be stingy with the oil/butter when mixing dough & to stop thinking about my cholesterol level if I want to eat roti prata! Based on her assessment of my pratas (from my pictures), she said that I should also brush some oil at every step.
  3. I did not flip my prata like the way the prata guy effortlessly flips his. I just stretched it, the way "even a 5-year-old can do". Watch the video in Dr Tay's post.
  4. Towards the end of his post, Dr Tay also suggested adding yeast or baking soda to produce fluffier pratas. I didn't add any. I also notice that some frozen pratas have baking powder in the ingredient list.
  5. In step 10, I did what my mum often did whenever she made her prata, i.e. I  turned the dough into an S shape dough.
  6. Prata is best served warm.  I reheat my cool prata in the microwave oven for about 30 seconds. Serve the prata with fish curry , chicken or beef curry or dalcha.
- I love this picture.

Roti Prata a.k.a Roti Canai
Recipe by Dr Tay of ieatishootipost.

Ingredients:
600g plain (10% protein) flour - I used Prima Plain Flour.
270ml water
80g (1/4 cup) condensed milk
15ml (1 tbsp) oil or melted butter or ghee (Next time, I'll add more.)
1 tsp salt
1 whole egg

Method:
1. In a container, combine water, condensed milk, oil, salt & egg. Mix the wet ingredients until well blended.

2. In a mixing bowl, combine the flour and liquid & beat at speed 1 (low) using the paddle attachment for 1 minute. You'll get a shaggy mess. Rest for 20 minutes.


3. Change to dough hook & knead at Speed 2 for 10 mins (rest for 5 minute after first 5 minutes). You should have a tacky dough. (Mine is quite dry.)


4. Divide the dough using a cutter into ten 100g portions. Shape each piece of dough into a ball.


5. Coat the dough with oil & place them in a container. I placed mine in a muffin pan, as suggested by Dr Tay. Cover the pan with a plastic & leave it in the fridge overnight.


6. Place a dough ball on a working table.


7. Using your palm & fingers, flatten the dough evenly.


8. Flip or stretch out the dough as thin & even as possible, without tearing it. Brush some oil onto the stretched dough.


9. Fold or gather the stretched dough to form a long piece as shown below. Brush some oil.


10. Starting from both ends, turn them to form an S shape dough as shown below. Brush some oil.


11. Pick up one part of the S-shaped dough & place it over the other part to form a bun-shaped dough as shown below.


12. Using your hand, flatten the dough to form a flat & even uncooked prata.


13. Heat up a flat pan & add some oil. Then fry the prata on medium fire until it turns golden brown.


I hope this tutorial will be helpful to those who want to embark on their prata-making journey. Good luck!