Wednesday 22 July 2015

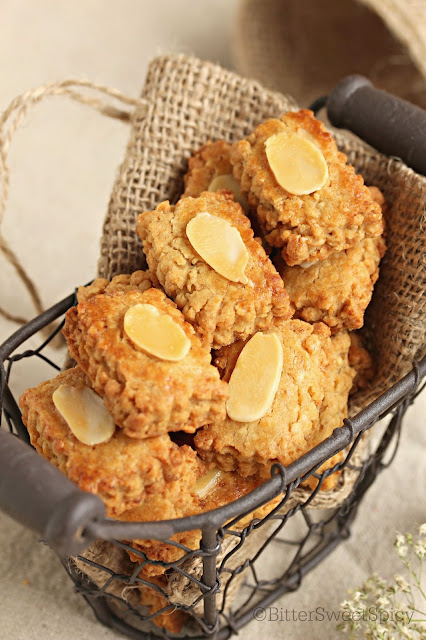
Almond Jackfruit Biscuits

As I was clearing the kitchen cabinet to make space for the raya cookies & snacks, I found a pack of jackfruit chips which I'd forgotten about. Then I remembered that I intentionally hid the pack because I wanted to use it to make jackfruit cookies... Good thing the chips were still good...


I'm not a fan of fresh jackfruit... but I love the chips a lot... The smell is not overpowering but they still taste great, just like the fresh ones. Besides, they are crunchy & so addictive! These jackfruit cookies on the other hand, have very subtle jackfruit flavour... so subtle that my son could not make out what the 'strange' flavour was. I would prefer if the jackfruit flavour was more intense... Anyway, the cookies are still great... I guess you just can't go wrong when the ingredients include French butter, Nestum & almonds.... hehe.


Almond Jackfruit Biscuits
Ingredients:
125g soft butter
100g brown sugar
1/2 tsp vanilla essence
1 egg
1/8 tsp egg yellow colouring
200g top flour (aka pastry flour) - combined with baking soda & sifted
1/2 tsp baking soda
70g jackfruit chips (finely ground)
50g Nestum (finely ground)
50g ground almond

sliced almonds for deco
1 egg, lightly beaten, for egg wash

Method:
  1. Beat butter, brown sugar & vanilla essence until light & fluffy. 
  2. Add in egg & yellow colouring, continue to beat until smooth. 
  3. Gradually add in top flour, ground jackfruit chips, Nestum & ground almond. Mix to a smooth dough. Allow dough to rest for 10 minutes.
  4. Roll out the dough & cut into preferred shapes using a cookie cutter. Arrange in baking tray (I lined with baking paper), egg wash & place sliced almonds on top. Bake biscuits in oven at 160 deg C for 8-10 minutes or until crispy.
Recipe by Kalsom Edi.
Source: Asmah Laili's Goodness Gracious Absolutely Delicious...

Monday 20 July 2015

Steamed Fruit Cake.... a very moist version..

Wishing all my Muslim readers Eid Mubarak & Selamat Hari Raya Aidilfitri.... Hope you have had a great time catching up with relatives & friends & enjoying the sumptuous spread of food... 


Tonight, I'm sharing with you a recipe for the steamed fruit cake I made for this raya. This recipe is different from the one I shared before. But I'm sure there are many of you out there who had used it before... not surprising as I kind of like this cake too... it's definitely more moist than the one I shared before. The taste is quite the same but if you prefer a very moist kek kukus, this is the recipe to go for. The moist texture is the result of adding proportionately more sugar but less mixed fruit vis-a-vis the previous recipe. Definitely a keeper!


Steamed Fruit Cake (Kek Kukus)

Ingredients:
300g mixed fruits (I used a combination of mixed fruits & blackcurrants.)
60g sliced almonds (I added.)
60g flour

375g butter (Golden Churn or SCS)
180g fine sugar
3 large eggs
1/2 tsp vanilla essence
1 tsp orange essence (I added.)
1/4 tsp ground nutmeg (I added.)
sarsaparilla brown liquid colour
*300g plain flour
*1 & 1/4 tsp baking soda
(* combined & sifted)
280g granulated sugar (for burnt sugar)

Method:
  1. Line, grease & flour a pan (8x8 inch). Prepare a steamer.
  2. Combine mixed fruits, almonds & the 60g flour until the fruits are coated with flour. This will prevent them from sinking when steaming the cake. Set aside.
  3. In a mixing bowl, combine butter, fine sugar, nutmeg, orange essence, vanilla essence & brown colour. Mix with a hand whisk or wooden spoon. 
  4. Add eggs, one at a time & mix just until well-blended. Do not over mix as the cake will become dry if the eggs are overmixed.
  5. Fold in flour & mix just until well-blended. Do not over mix. Set aside.
  6. Prepare burnt sugar by placing granulated sugar into a non-stick skillet with a handle over medium-low heat, stirring constantly with a wooden spoon as the sugar melts. Once it turns dark brown, remove from heat and carefully pour to the butter mixture. Mix until well blended using a wooden spoon. (What I did: Before pouring the burnt sugar, I made a well in the butter mixture & poured the burnt sugar into the well. Starting from the center, I stirred the burnt sugar into the mixture. This is to prevent the burnt sugar from sticking to the side of the bowl as it hardens almost as soon as it sticks to the side. The hardened sugar that you manage to scrape from the side of the bowl can still be added to the batter.)
  7. Finally, fold in the mixed fruits & almonds until just blended. Do not over mix.
  8. Pour mixture into the baking pan. Cover the pan with aluminium foil & tie it with a string (I used a rafia string). Tuck in the foil, making sure the pan is water-proof.
  9. Place the pan on a steamer & steam for 4 hours. (Diana steamed on high heat for first 2 hours & lower the heat to medium for the rest of the steaming time.)
  10. After 4 hours, remove pan from steamer. Remove foil & leave pan aside for 10 minutes. Then remove cake from pan. Leave to cool.
Adapted from DianaA @ myresipi.

Notes:
  1. Do not mix the cake mixture using a cake beater as this will result in over beating which in turn will produce a dry cake. Just use a hand whisk or wooden spoon.
  2. According to Diana, you may also steam the cake for less than 4 hours but it will not keep well.
  3. If it's steamed for 4 hours, the cake can be stored in the fridge for 6 months. To serve, leave the cake in room temperature for about 3 hours before serving.
  4. I've adjusted the quantity of ingredients to fit an 8x8-inch pan. (The original recipe yields two 7x7-inch pans.)

Monday 13 July 2015

Lapis Mocha Latte

This is another superb lapis cake which I baked for this coming raya. Soft & moist, it just melts in your mouth.


Lapis Mocha Latte

400g butter (I used unsalted butter & added 3/4 tsp salt.)
200g sweetened condensed milk
1 tsp vanilla essence
125g fine sugar
50g cake flour
20 egg yolks
1 tsp mocha paste

Method:
  1. Preheat oven (grill or top heat only) at about 180 deg C. (Refer to my post here for more tips on baking lapis cakes.) 
  2. Grease & line the bottom of a baking pan. (10x7 inch or 8x8 inch.) 
  3. Beat butter, condensed milk & vanilla until creamy & pale. Set aside.
  4. Combine egg yolks & sugar in a mixing bowl & beat until thick & pale. 
  5. Add in butter. Mix using hand whisk or spatula until well blended.
  6. Fold in flour & mix until well blended.
  7. Divide the batter into 2 equal part. Add mocha paste into 1 part & mix well. Leave the other part plain.
  8. Pour 2 big spoonfuls or 85g of  mocha batter into baking pan. Spread the batter evenly & bake for about 3-5 minutes or until the layer turns golden brown. Remove the pan & press the layer with a lapis cake presser to even out the layer & pop any bubbles. Continue with the rest of the mocha batter until finish. Then continue baking the plain batter, each layer about 85g or 2 big spoonfuls.
  9. After baking the last layer, bake the whole cake using top & bottom heat at 200 deg C for about 10 minutes.
  10. Remove cake from pan and allow to cool on a cooling wire rack before serving.

Sunday 12 July 2015

Lapis Pisang Salai (Smoked Banana Lapis Cake)

I baked this Lapis Pisang Salai last weekend. I baked 2 of them.... 1 for my mum & 1 for my mother- in-law. I had wanted to try this recipe a few months ago... had bought the pisang salai from jb but we ended up snacking on them. Bought the pisang salai again recently & I was determined to bake the cake for this hari raya.


I had cut out this recipe from the local Malay newspaper many many years ago. I thought it was quite interesting.... was quite intrigue by how it would taste.... Actually, because the cake has loads of pisang salai, when I took a bite,  it's like eating the pisang salai itself except it's not chewy.... The cake is soft & moist, & unlike all the cakes I've ever tasted before, this has a tinge of smoky flavour......


Lapis Pisang Salai 
(Smoked Banana Lapis Cake)

Ingredients:
200g pisang salai (smoked banana) - sliced
100g hot water
1 tbsp honey or golden syrup

400g butter
170g Nestle cream (Pure dairy sterilised cream in a can.)
1/2 tsp banana essence (I used vanilla essence.)

20 egg yolks
3 egg white
180g caster sugar
100g Hongkong flour
25 ml ice water
1 tbsp cake stabilizer (I used ovelette.)

Method:

  1. Combine banana, hot water & honey. Mix & leave overnight in a fridge.
  2. Preheat oven (grill or top heat only) at about 180 deg C. (Refer to my post here for more tips on baking lapis cakes.) 
  3. Grease & line the bottom of a baking pan. (10x7 inch or 8x8 inch.) 
  4. Combine butter, cream & essence in a mixing bowl. Beat until pale & creamy. Add the banana & mix thoroughly.
  5. In another mixing bowl, combine eggs, sugar, flour, ice water & stabilizer, beat on high speed for 7-10 minutes until thick & fluffy. Add in butter & mix thoroughly using a hand whisk.
  6. Pour 2 big spoonfuls or 85g of  batter into baking pan. Spread the batter evenly & bake for about 3-5 minutes or until the layer turns golden brown. Remove the pan & press the layer with a lapis cake presser to even out the layer & pop any bubbles. Continue with the rest of the batter until finish.
  7. After baking the last layer, bake the whole cake using top & bottom heat at 200 deg C for about 10 minutes.
  8. Remove cake from pan and allow to cool on a cooling wire rack before serving.

Recipe by Aini Salam.
Source: Berita Harian (Singapore)

Tuesday 7 July 2015

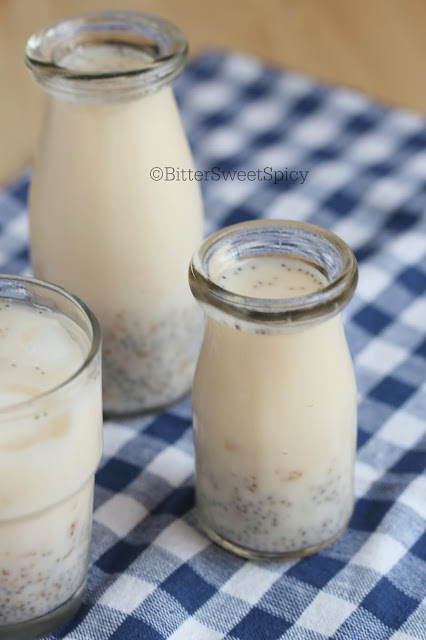
Air Katira (Katira Drink)

Katira drink, or Air Katira in Malay, is often served during Ramadhan because of its cooling property. Originally a South Indian Muslim beverage, it has become very common in this part of Asia..... it's hard to miss this drink if you go to any Ramadhan food bazaar. You can also prepare it at home... and tonight I'm sharing the recipe that my mum often uses.


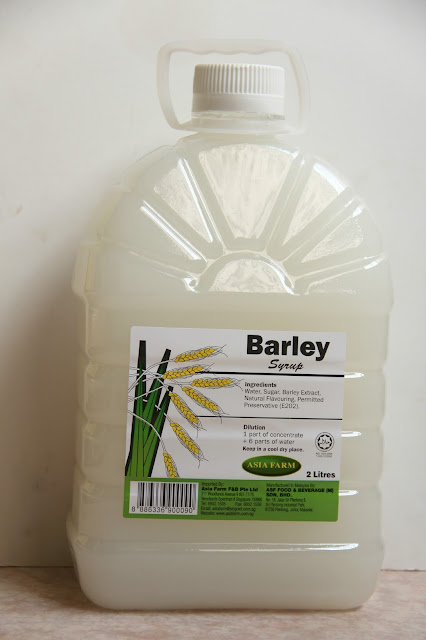
I use this brand of barley syrup.

Air Katira (Katira Drink)

Ingredients:
1 tbsp katira (tragacanth gum)
5-10 pieces kamang / kembang semangkok (flower bowl)
1 tbsp biji selasih (basil seeds)
3/4 cup barley syrup (not lemon barley)
1/2 cup evaporated milk
about 6 cups water
ice cubes

Method:
  1. Soak the katira in water for at least half a day or overnight, depending on the size of the katira. It's ready to be used when the katira becomes soft & looks jelly-like. Once soft, strain. Then rinse & strain again. Set aside. 
  2. Soak the kamang/kembang semangkuk in a large bowl of water. It doesn't take long for it to swell & turn soft, just 1-2 hours. Once softened,  strain & remove the skin & seeds. Then rinse with cool water & strain again. Set aside.
  3. Soak the biji selasih in a bowl of water. This also doesn't take long for it to swell & turn soft. Once softened,  strain &  rinse with cool water. Strain & set aside.
  4. In a large bowl, combine katira, kamang/kembang semangkuk & biji selasih.
  5. Add in barley syrup, evaporated milk & water. Mix well & taste. Adjust the taste by adjusting the amount of syrup, milk &/or water to your preference. Add ice cubes or crushed ice before serving.
Update:
You can purchase katira, kembang semangkuk and biji selasih from any Indian neighbourhood provision shop. If you are in Singapore, you can also get them from Mustaffa Centre.

Sunday 5 July 2015

Almond Sugee Cookies

I've never made sujee cookies for hari raya before because my mum would always make a bottle for me. This year, I decided to bake them myself as I wanted to try a different recipe. So I made these melt-in-the- mouth cookies.... can't stop munching on them coz they are so good & sooo addictive. 


Almond Sugee Cookies
(The recipe below is half the original recipe & it yields 125 cookies. )

Ingredients:
227g ghee (clarified butter)
150 g sugar powder
a pinch of salt
1/2 tsp of baking powder
50g almond powder (I toasted slightly. )
1/2 tbsp sweetened condensed milk
500g self-raising flour (sifted)

Method :
  1. Mix and stir well the ghee, sugar and salt.
  2. Add baking powder, almond powder and condensed milk.
  3. Add the flour bit by bit, until you are able to form a soft dough.
  4. Make into small round balls and put into paper cups in a baking tray. (I form into 8g balls & I didn't use paper cups.)
  5. Bake at 160 deg C for 15 mins. (I baked at 140 deg C, fan-forced, for 30 minutes.)
Recipe by Forty and Beyond.

Wednesday 1 July 2015

Red Velvet Choc Chip Cookies

As I'm typing this, my eyes can hardly open.... Was at work till almost 5, did some driving errands & only reached home at about 7.30. Now, I'm really feeling exhausted... Ok..., this is another chocolate chip cookies I made on Friday. Unlike the other chocolate chip cookies, these are not as  light & crunchy... they're slightly dense & soft on the inside but still tasty & addictive. Another highly recommended recipe for Hari Raya!


Red Velvet Choc Chip Cookies
Ingredients:
120g plain flour (I used top flour.)
50g rice flour
1 tbsp cocoa powder
120g Planta brand margerine (I used unsalted butter & added 1/2 tsp salt.)
10g ghee (clarified butter)
100g castor sugar
1 egg yolk
50g almond nib (Toasted at 170 deg C for 5 minutes.)
1/2 tsp vanilla essence
1/2 tbsp red colouring (I used 1 tsp Star brand artificial cochineal red food colouring.)
30g white chocolate chips (I used 60g.)
30g chocolate chips (I didn't use.)

Method:
1. Combine the two flours & cocoa powder. Sift & set aside.
2. In a mixing bowl, combine margerine (butter), ghee & castor sugar & beat till pale.
3. Add in egg yolk & mix well.
4. Add in vanilla essence & colouring & mix till well blended.
5. Add in flours & cocoa powder. Mix using a wooden spoon or spatula till a dough is formed.
6. Finally, add in almond nib, half the chocolate & half the white chocolate chips.
7. Spoon some dough onto a lined baking pan. Continue until finish. 
8. Decorate the top with the remaining chocolate chips.
9. Bake in a preheated oven at 150 deg C for about 20 minutes. (I baked for about 30 minutes.)
10. Once baked, transfer cookies onto a wire rack & leave to cool completely. Store in an air-tight container.

Recipe by Planta from the Seceria Air Tangan Ibu campaign.
Source: Masam Manis.
Related Posts Plugin for WordPress, Blogger...