Showing posts with label Pastry. Show all posts

Friday, 9 January 2015

Vanilla Malted Cookies

The new year started out very well for me, at least as far as baking is concerned.... I baked Turkish Pide for breakfast (again!), &  in the afternoon, I baked some cookies, something I've not done for sometime.... I would have carried on baking something else but we had planned to go out for lunch. Anyway, I was busy baking & the helper was on leave, so lunch would certainly not be home cooked. Good thing we had the pide for breakfast as it sustained us well through the late afternoon...


I found the recipe for these Vanilla Malted Cookies on The Little Epicurean. What made me want to test this recipe out was the use of 2 ingredients which I love a lot,  Horlicks & cream cheese. They certainly made these cookies so addictive that none would have been left behind had I not hidden some for my photo shoot. Maryanne is right, the marvelous taste just leaves you craving for more. 


My little helpers....

Vanilla Malted Cookies

Ingredients:

2 1/2 cups (340g) all-purpose flour - I used pastry flour, aka top flour.
1 cup (140g) malted milk powder - I used Horlicks.
1 tsp baking powder
1 tsp fine sea salt
1 cup (250g) unsalted butter, room temperature
4 oz (125g) cream cheese, room temperature
1 cup (200g) granulated sugar - I used 170g.
1 tbsp vanilla bean paste
1 large egg

Method:
  1. Preheat oven to 350 deg F (177 deg C). 
  2. In a medium bowl, whisk together flour, malted milk powder, baking powder and salt. Set aside.
  3. In the bowl of a stand mixer fitted with a paddle attachment, beat together butter and cream cheese until smooth. Slowly add in sugar. Mix until combined. Add vanilla paste and egg. Mix on medium speed until combined. Add flour mixture 1/2 cup at a time on low speed.
  4. Transfer batter to a large piping bag fitted with a large star tip. Pipe rosettes (or strips, circles) onto parchment lined baking sheets. Space cookies at least 1-inch apart. Bake for 14 minutes, rotating sheet midway through baking. (I baked mine at 170 deg C for about 25 minutes.) Bake until edges are lightly golden brown. 
  5. Let cool in tray for a couple of minutes before transferring to wire rack to cool completely. 
Original recipe: Martha Stewart's Cookies

Notes:
  1. I reduced the sugar by 30g & I'm glad I did that because the cookies were not overly sweet.
  2. To add some interest to the otherwise plain-looking cookies, I sprinkled some colourful jimmies.


I’m submitting this post to Best Recipes for Everyone Jan & Feb 2015 Event Theme: My Homemade Cookies organized by Fion of XuanHom’s Mom and co-hosted by Victoria Bakes.

Monday, 7 July 2014

Hong Kong Flaky Egg Tarts

Last week,  I made Hong Kong flaky egg tarts. The tarts are different from the ones I made before as this time, the shells are made using puff pastry instead of the cookie pastry. I used the recipe shared by Meg of Dreamersloft


The tarts not only look gorgeous, they are delicious too! I especially love the pastry.... very flaky, buttery & beautifully layered. If you planned to make these, be prepared to be patient as you need to fold the pastry & leave it to rest for a few times. This is especially challenging in a humid condition like Singapore's. One thing for sure, the effort is all worth it!


Thank you Meg for generously sharing this recipe. I've cut & pasted the recipe below, but you still need to go to Meg's blog for the step-by-step picture tutorial.


Hong Kong Flaky Egg Tarts

Recipe yields 8 tarts
4cm base tart casing (measures 6cm from the top)
9cm perforated cookie cutter

Oil Dough:

100g Plain Flour, sifted
160g Unsalted Butter, cubed and keep in chiller until use

Water Dough:

20g Bread Flour, sifted
60g Plain Flour, sifted
5g Custard Powder, sifted
10g Egg
40g Iced Water

Filling:

100g Fresh Milk
50g Caster Sugar
2 Eggs
1 drop Vanilla Extract

Method:
  1. Make the oil dough. Combine the flour and cold cubed butter in a large bowl. Use pastry cutter to press the butter into the flour until it forms a rough dough. Alternatively, use electric blender and pulse the mixture until rough dough forms. Work quickly so that butter do not melt.
  2. Place the dough on a piece of clingwrap and wrap it up into a small rectangle parcel (about 10cm x 15cm). Chill in fridge for 30 mins.
  3. Make water dough. Combine all the ingredients into an electric mixer, and blend until a dough forms. Knead for 5 mins until dough is smooth (texture feels like ear-lobe). Mold into a rough oval shape, wrap in clingwrap and chill for 20 mins.
  4. Take both water dough and oil dough out from the fridge. Dust the work surface with flour so that the dough will not stick to the work surface. Remove clingwrap (keep it aside). Roll the water dough into a large oval, make sure it has sufficient space allowance for the oil dough to be enclosed within. Place the oil dough in the middle of the water dough.
  5. Wrap the water dough like a parcel, encasing the oil dough, make sure no oil dough is exposed at the seams.
  6. Slightly flatten/roll the combined dough, dust with some flour top and below and wrap the dough in clingwrap. Chill in the fridge for 20 mins.
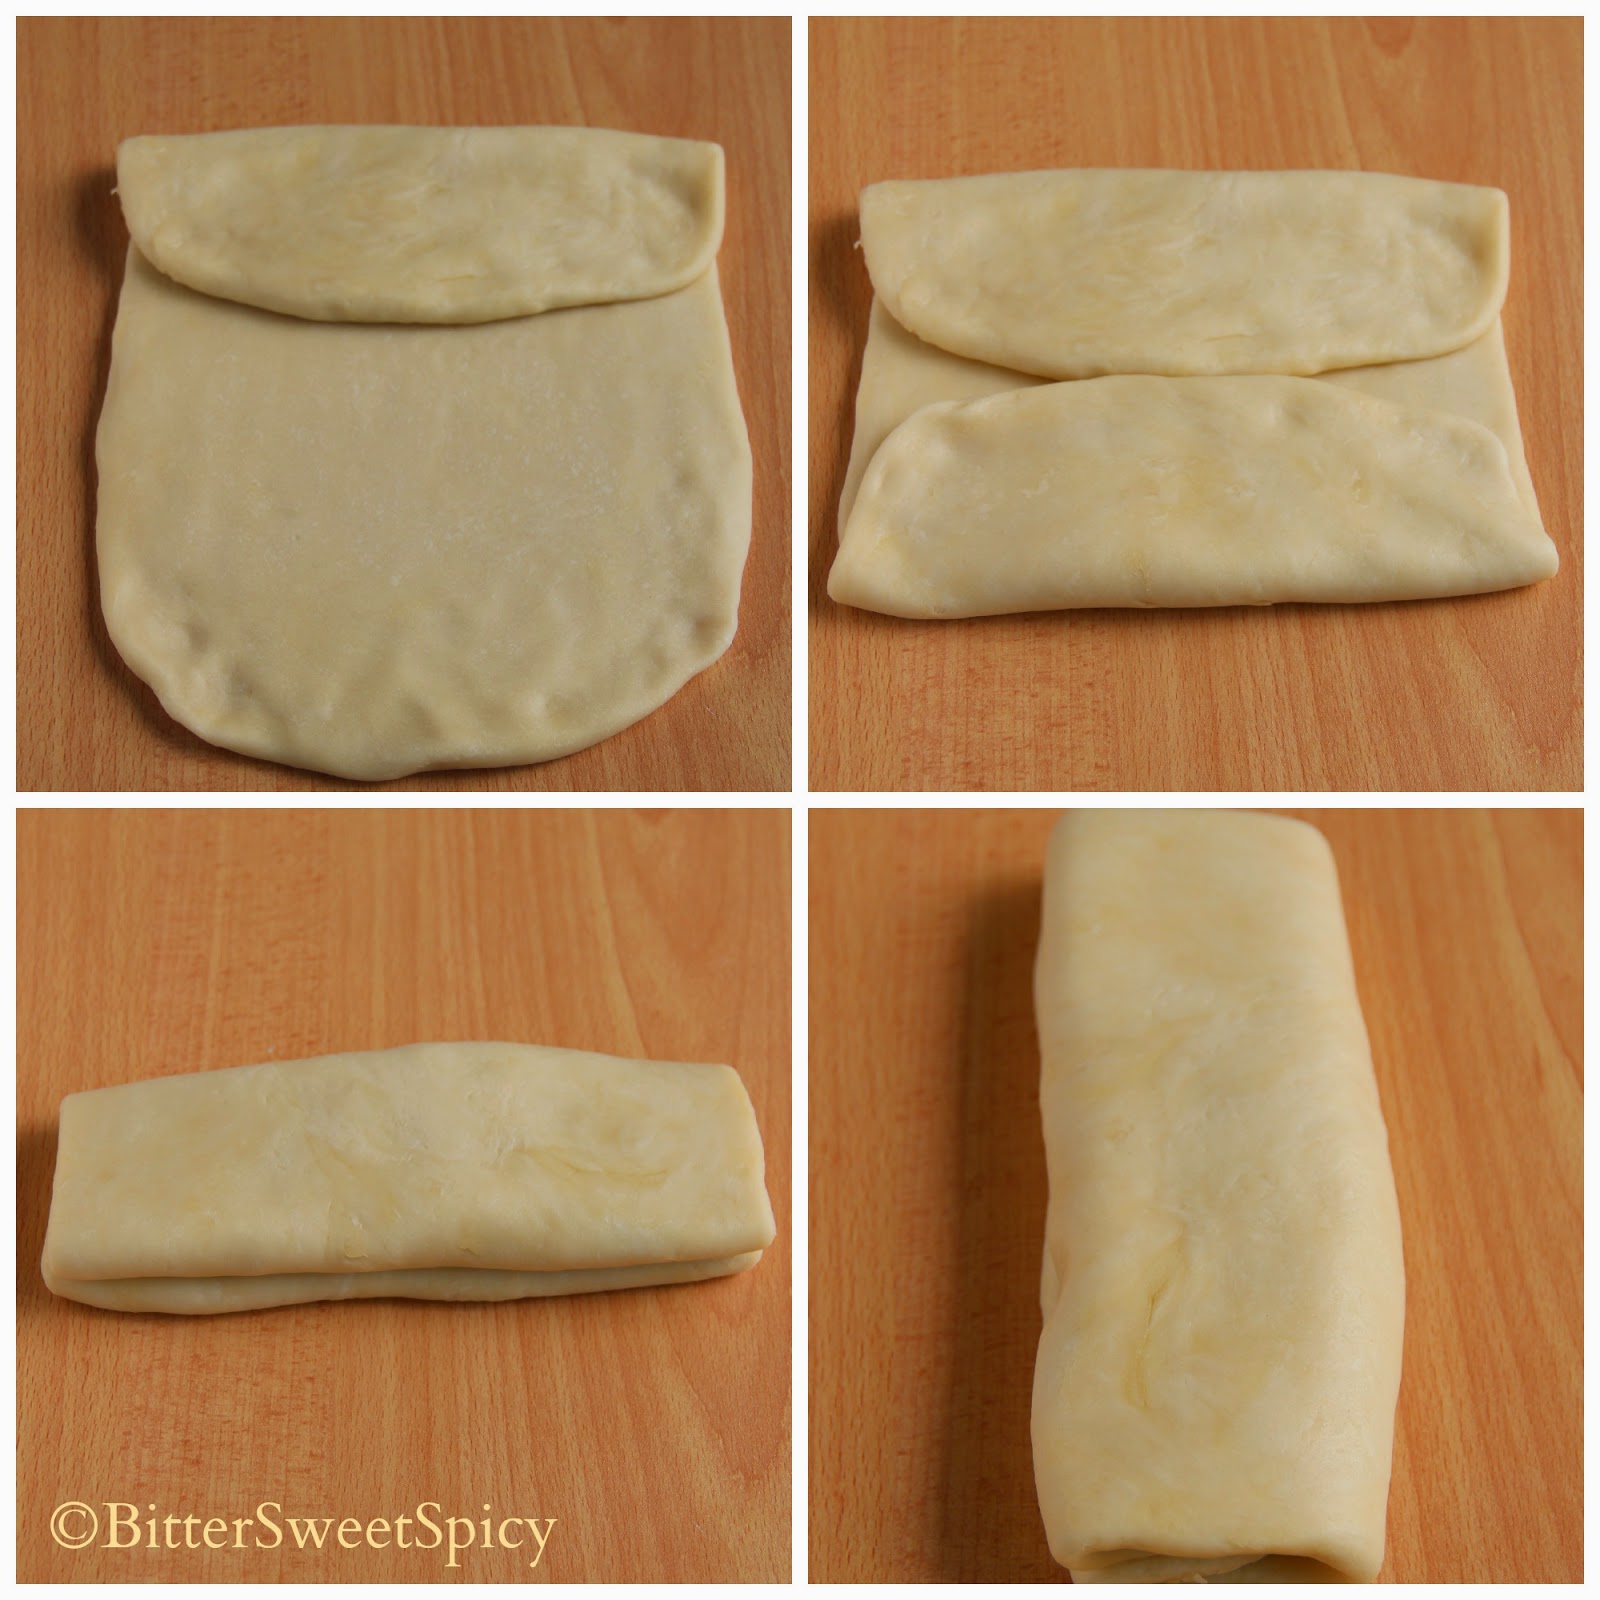
  7. Retrieve the dough from the fridge. Dust the work surface and rolling pin with flour. Remove clingwrap (set aside), dust top and bottom of dough with flour. Roll the dough into half inch thickness in rectangle shape. Fold one side towards the centre (as shown).
  8. Fold the other side towards centre. You will have 3 layers. Dust with flour all around. Wrap in clingwrap and chill in fridge for 20 mins. This is round 1 of folding. (We will do 3x3x4)
  9. Repeat step 7.
  10. Repeat step 8. This is round 2 of folding.
  11. Retrieve the dough from the fridge. Dust the work surface and rolling pin with flour. Make sure to dust a larger surface area. Remove clingwrap (set aside), dust top and bottom of dough with flour. Roll the dough into half inch thickness in rectangle shape. Fold left and right sides towards the centre (as shown).
  12. Fold one side of dough towards centre again. You will see 4 layers now. This is round 3 and final round of folding. Dust with flour, clingwrap and chill in fridge for 20 mins.
  13. Retrieve dough from fridge. Dust work surface and rolling pin with flour. Place dough on work surface, dust with flour. Roll the dough flat into 0.5cm thickness. Use cookie cutter to stamp the dough into individual tart shells.
  14. Wrap tart base using clingwrap (separate each layer) and chill in fridge for 15 mins. *At this point you could freeze the tart base for subsequent use.
  15. Retrieve tart base from the fridge. Mold each piece into the tart casing, pressing down the dough towards the sides and bottom of the casing. Avoid touching the top part (perforated) else pattern will not be visible after baking. As you can see, I'm using a larger cookie cutter because I want to create height for the egg tart without having to "push" the base upwards (like some recipes do). Poke some holes in the tart base using a fork gently (not too hard else egg filling will leak). Chill tart base in fridge for 15 mins. Preheat oven at 220 degree celsius.
  16. Prepare egg filling. Combine all ingredients of egg filling, make sure sugar is fully dissolved. Sieve the egg filling 2 times. Once tart base is ready, pour the egg filling into each tart to about 70-75%.
  17. Place tray of egg tarts at the bottom most rack. Bake at 200 degree celsius for 15 mins. After 15 mins, bake at 180 degree celsius for 10 mins. After 10 mins, slightly open the oven door, slip a cloth or oven mitt by the door and let egg tart bake in residual heat for another 10 mins.
  18. After 10 mins, remove the tray from the oven and let egg tarts cool slightly before removing the tarts from the casing.
Recipe by Dreamersloft.

Wednesday, 19 March 2014

Spiral Curry Puffs

Since it's the school holidays, I've a list of recipes that I want to experiment with, along with a long list of things I want to do. Sigh.... it's already halfway into the holidays, but I'm not even halfway through the lists..... 


Anyway, I made Spiral Curry Puffs for teatime yesterday using the dough recipe by Alex Goh. I've made this before a long time ago. I remember feeling quite disappointed with my puffs then because the lamination was not as neat & fine as the one in the book. This time, I'm still not fully satisfied with my puffs... the lamination turned out okay, but many of my puffs were broken before I could fry them. I wonder what could have gone wrong....


The good thing is, overall, the puffs were not  a total disappointment. The tasty & spicy filling wrapped in the flaky pastry made an addictive snack! 


Spiral Curry Puffs

Filling:
2 cm ginger (grated)
3 pods cardamom
2 whole cloves
2 cm thin cinnamon stick
2 tbsp meat curry powder (you may add more) - mixed with water to form a paste
200g minced meat (I used beef.)
250g potatoes (diced)
1 onion (diced)
mint leaves
salt
oil for sauteing

       Heat up oil in a frying pan. Fry cloves, cardamom & cinnamon stick until fragrant. Add  ginger  & curry paste. Continue frying until fragrant. Add meat & cook for about 3 minutes. Then add in potatoes & cook until soft. Add water when necessary. Finally add in onion, mint leaves & salt. Once cooked, remove from stove & set aside to cool completely.

Dough:

Water dough
260g flour
50g margarine/butter
20g sugar
100-140g water
Combine all ingredients & mix to form a smooth dough. Divide it into 2 equal portions & let it rest for at least 20 minutes.

Oil dough
180g flour
100g shortening (I used crisco.)
Combine all ingredients & mix to form a smooth dough. Divide it into 2 equal portions.

Assembly:

1. Wrap 1 portion of the oil dough with 1 portion of the water dough. (i.e. oil dough is inside & water dough on the outside.) Then roll it into a rectangular shape.


2. Make a book fold. Then rotate the dough 90 deg. 


3. Roll it into thin sheet of 2mm thickness. Then roll it up like a swiss roll. Leave it aside to rest for at least 10 minutes. Then slice the dough into 8 equal parts. Repeat the assembly process with the other portion.


4. Roll each piece of sliced dough into 3mm thickness. Place filling & pinch to seal.


5. Fry in hot oil until golden brown.

Dough recipe by Alex Goh from Irresistible Pastry.

I'm linking this post to Cook-Your-Books #10 hosted by Joyce of Kitchen Flavours.

Friday, 7 June 2013

Indian Curry Puff a.k.a Karipap Bai.

I'm glad the school term is over. The last three weeks of the term had been hectic...... the daily challenges to meet datelines while keeping up with the ever active eight-year-olds had left me feeling tired & sleepy everyday. I'm so thankful I'm healthy..... so managed to complete the tasks with no major hiccups. There wasn't much time to update this blog although I managed to squeeze some time during the weekends to prepare some simple desserts.
Hard to believe  it's already almost the end of the first  week of the holidays! It's been a good one so far...... besides doing the routine, managed to watch the tele a lot, do some window shopping & bake, of course!


I baked these Indian Curry Puffs, or what we usually call Karipap Bai,  twice this week. Karipap Bai is one of the iconic snack in Singapore, especially among the Muslims. I started eating them when I was very young. Back then, my family often bought them from the Bai Roti who peddles on his motorcycle everyday. 
I learnt to make them in 2001 during one of the weekend baking classes with Kak Wannah. Love the flaky pastry of these puffs, unlike the ones sold outside which sometimes can be hard & crunchy, depending on where you purchase them. I must say, this is one unhealthy snack... just look at the layers of fat & more fat on top of the puffs used in the preparation! Having said that, I would still buy & eat them occasionally because I just love them! Btw, I like eating them with hot green tea as it helps to clear the fat that tends to stick to the tongue.
Ok, enough of the ramblings... I should get started with the recipe. This is going to be one very long post, in fact, my longest so far! I've included a lot of details in the method followed by many pictures to illustrate the folding of the puffs. If you have not made these puffs before, there's  no way you  would understand just by reading the method. So I've included the pictures for the step-by-step tutorial. My advice is, read the instructions carefully & read them several times before you start doing it. It's really not very difficult...


Some notes when making these puffs:
  1. I followed Kak Wannah's recipe very closely except for the rest periods which she did not emphasise. During my pastry-making course, I learnt that resting the dough after each folding is very important as this will prevent the dough from becoming tough. It's also an important step to produce flaky, not hard,  puffs. 
  2. I made 16 big puffs from this recipe. Although they look small in the pictures, they are actually quite big. The side for each square pastry (refer picture for step 18) is about 10cm. So if you want to make smaller ones, cut into smaller squares in step 13.
  3. Like any layered puffs, these puffs must be baked on very high heat (200 deg C) to produce nicely-layered puffs. It's good to use a thermometer to ensure the correct temperature. (I had to put mine at 220 deg.)

Indian Curry Puffs  a.k.a  Karipap Bai.
Recipe by Wannah Alshatrie (with more details in the method).

Pastry
Ingredients:
600g plain flour
1 egg (beaten)
250ml warm water (not hot)
1 tsp salt
1 tsp yellow colouring (reduce if use the powder form)
200g pastry margarine

flour for dusting
egg white or water for sealing (I used water.)
vegetable oil of topping

Steps:
  1. Combine warm water, salt & colouring in a bowl & mix until salt dissolves.
  2. Combine flour, egg & water in another bowl & mix just until the mixture forms a dough. Do not overmix. Don't worry if  there're still specks of flour in the dough as they will 'disappear' after the rolling & folding process. Cover dough with plastic & leave to rest for at least 20 minutes.
  3. In the meantime, place the pastry margarine on a plastic & place another piece of plastic on the margarine. Roll out the margarine evenly into a rectangle. Leave aside.
  4. Roll out the dough into a rectangle about 1cm thick, as carefully & evenly as possible. Then place the rolled-out pastry margarine on one side of the dough. 
  5. Fold dough into 2, just like you would close a book. Press the edges to seal.  Cover dough with plastic & leave to rest for at least 20 minutes.
  6. Turn dough at 90 deg. Then roll dough into a rectangle.
  7. Divide the rectangle crosswise into thirds by sight alone or mark the dough lightly with the edge of your hand. Fold one-third of the dough over the middle section. 
  8. Then fold the remaining one-third over both of them, brushing away the excess flour from the inside as you fold. 
  9. Next, fold into thirds again, this time from top & bottom, to form a square.  Cover dough with plastic & leave to rest for at least 20 minutes.
  10. Roll out the dough into a rectangle,  about the same size  as  in step 6. Repeat Step 7 & 8.
  11. Now cut the dough into thirds.
  12. Place the bottom third onto the middle third & followed by the top third. You'll end up with a very tall dough. (This step is just like step 9 except that this time the thirds are cut.) Cover dough with plastic & leave to rest for at least 20 minutes.
  13. Using a knife & a ruler, divide the dough into small squares & make markings on the dough. (I divided it into 16 squares.) Then carefully cut the small squares. (You may also place the dough in the refrigerator for a while so it's easier to cut it.)
  14. Using your fingers, press each square gently & coat it with flour.
  15. Starting from the middle, roll out each piece upwards & then downwards, turning it at 90 deg after every set of upward- & downward-rolling. This is to ensure that the square shape is maintained throughout the rolling process.
  16. Then, turn the dough such that you are facing a diamond shape dough. Starting from the middle, roll out upwards & then downwards, once only. 
  17. Place the side of each square with lesser veins facing upwards. So the side with more veins will be the outer part of the puff.
  18. Spoon the filling on the square. Brush egg white or water on the edges.
  19. Fold into a triangle & seal. 
  20. Then dip the puff into a bowl of water, & using your other hand, rub off any flour that is stuck to the pastry. Lift up the puff & drain as much water as possible & place it on a baking tray which has been lined with baking paper. 
  21. Just before putting the tray of puffs in the oven, pour a tsp of oil onto each puff & spread it evenly using a brush.
  22. Bake in a preheated oven at 200 deg C for about 25 minutes.
Illustration for Steps 4 - 9.

Step 4: Place rolled-out pastry margarine on one side of rolled-out dough.

Step 5: Fold dough into 2,  like closing a book. Press the edges to seal. Leave to rest for 20mins.

Step 6: Turn dough at 90 deg. Then roll out dough into a rectangle.

Step 7: Fold one-third of the dough over the middle section.

Step 8: Then fold the remaining one-third over the other thirds.

Step 9: Next, fold into thirds again, this time from bottom & then top, to form a square. Leave to rest for 20 mins.

Illustration for Steps 11 - 21.


Step 11: Cut the folded dough into thirds.

Step 12: Place the bottom third onto the middle third & followed by the top third. Leave to rest.

Step 13: Divide & cut dough into small squares.

Step 14: Using your fingers, press each square gently & coat it with flour

Step 15: Starting from the middle, roll out each piece upwards & then downwards. 

Step 16: Roll out upwards & then downwards.

Step 17: Let the side of pastry with lots of veins be the outer part of puff.....

.....while the side with lesser veins be the inside part.

Step 18: Spoon filling onto the dough.

Step 19: Fold into a triangle & seal.

Step 20: Dip puff into water to wash off the flour.

Step 21: Pour oil & spread it evenly using a brush.

Yummy Curry Puffs!
Filling
Ingredients:
500g potato (peeled & cut into small pieces)
200g onion
200g ground meat (I used chicken breast which I cut into small pieces.)
4 tbsp meat curry powder (mix with some water to form a paste) - you may adjust the amount of  curry powder to your preference.
1 tbsp ginger & garlic paste
3 cloves, 3 cardamom, 1 inch cinnamon stick
2 tbsp cooking oil
chinese parsley & spring onion (I replaced these with mint leaves.)
salt to taste

Method:
  1. Heat up oil in a frying pan.
  2. Fry cloves, cardamon & cinnamon stick until fragrant. Add garlic & ginger paste & continue frying until fragrant.
  3. Add curry paste & continue frying. Add meat & cook for about 3 minutes & add in potato & cook until potato is soft. Add water when necessary. Finally add in onion, mint leaves & salt.
  4. Once cooked, remove from stove set aside to cool completely.
Related Posts Plugin for WordPress, Blogger...