Showing posts with label Bread. Show all posts

Tuesday, 29 December 2015

Roasted-Potato Bread

I baked roasted-potato bread last week.... It's been a long time since I last baked a rustic bread. I wish I'm able to bake it more often, but, the problem is, baking any kind of bread entails a long process.... it takes hours from the mixing to the the baking stage and if you want to bake one which uses a pre-ferment dough, it can take days...


Given that I'm often out of the house either for work or running of family errands, baking bread at home is a luxury....  Last week, I started mixing the dough for the potato bread before going to bed and thought that I would be able to bake it in time for breakfast the next morning. Alas, it was not meant to be... I had to leave the house in the morning and only managed to bake it in the afternoon. 


I love baking breads that involves the use of starter dough or an overnight proofing... this method always produces breads that are  more fragrant and have more intense flavour than the straight-dough method. With the addition of whole-grain flour and roasted potato, this potato bread has even more robust and distinctive flavour, something that's always absent in those soft & fluffy store-bought breads... My eldest daughter and I had the bread with kacang pool while the rest had it with scrambled eggs. Everyone liked it.


This recipe is taken from a book that my husband bought for me many years ago. Although he does not bake, he knew that the book was a good one after browsing it. He was so confident that he did not even consult me before paying for it. Indeed, the book by Jeffrey Hamelman is an excellent book. It is thoroughly researched and has very detailed explanation on all you need to know about baking bread. It should be a textbook for all bread-baking students. Another great feature of this book is, besides giving the recipe in US and metric measurement for bulk baking, it also includes recipe that's designed for home baking.


So if you have not tried baking rustic bread before, I would encourage you to try making this... The recipe below is half the recipe designed for home baking. Take a look at the videos that I recommend below so that you'll have a better idea of the correct way of handling the dough. Also, you may want to read more bread-making tips by Peter Reinhart, another bread-making guru, which I shared before.


ROASTED POTATO BREAD

Ingredients:
Pâte Fermentée  (Starter Dough):
136g (4.8 oz) bread flour
88g (3 oz) water
1/2 tsp salt
1/16 tsp  instant yeast (I used a pinch.)

Final Dough:
250g (8.8 oz) bread flour
68g (2.4 oz) whole wheat flour
190g (6.7 oz) water
1/2 tbsp salt
1/2 plus 1/8 tsp (2g) instant yeast
115g (4 oz) baked potatoes (The recipe recommended Yukon Gold, I used Russet.) - mashed or cut into small pieces
all of the above pâte fermentée

Method:
  1. The day before baking the bread, mix the pate fermentee in a medium bowl until just smooth. Cover and allow to sit for 12 to16 hours at about 20 deg C. (I placed the bowl in the fridge. Before mixing the final dough, I removed the bowl of pate fermentee from the fridge & left it in room temperature for about 30 minutes before proceeding with the next step.)
  2. Add all the ingredients to the mixing bowl, including the potatoes, but not the pâte fermentée. In a spiral mixer, mix on first speed for 3 minutes in order to incorporate the ingredients. As the dough is coming together, add the pâte fermentée in chunks. If necessary, correct the hydration by adding water of flour in small amounts. The dough should feel slightly stiff, but since the potatoes hold a fair amount of moisture, which they will eventually contribute to the dough, be careful not to add too much water as the dough mixes. Finish mixing on second speed for 3 - 3 1/2 minutes. The dough should be supple & the gluten moderately developed. 
  3. Place the dough into an oiled bowl, cover, and let it rise until doubled, about 90 minutes, with one stretch & fold after 45 minutes. (Watch this video on how to stretch & fold bread dough.)
  4. Divide the dough into two pieces and form it into two boules (French for balls) or batards, and let rise for about 75 minutes. (Watch this great video on how to shape & bake bread.)
  5. Preheat the oven to 230 deg C (450 deg F) & pre-steam the oven. 
  6. Score the loaves and bake them for about 40 minutes. If the loaves are turning dark too quickly, lower the temperature by 10-20 deg.
  7. Cool completely on a rack before slicing.
Recipe is from Bread, A Baker's Book of Techniques and Recipes by Jeffrey Hamelman.


Monday, 21 December 2015

Pastry Pockets with Nutella Filling

It feels like a long time since I last posted here.... Been pretty busy this past month... spent the first part of the holidays decluttering the house, which has not been an easy task especially since we have lived in this house for 20 years now.... We also spent a week in UAE for a family getaway.... that, was truly awesome since we had not gone for a holiday outside SE Asia for the longest time! It was also an eye-opening experience for the family as this is our first (except for my husband) visit to the Middle East. Now we are back to continue with the decluttering  before the school term starts in two week's time. Oh no!!


So today's recipe is inspired after I tasted some addictive pastry pockets from Tim Hortons when we were in Dubai. They are basically doughnuts, cut in rectangles & filled with Nutella... but they taste so good, especially when I had them with the hot cardamon chai. Just talking about it makes me want to have it right now! Haha.. 


If you had made doughnuts before, this would not be too difficult... the only messy part was when I tried to pipe the filling..... but believe me, the mess is all worth it! For the dough, I used the potato doughnut recipe which I shared before as I just love its soft & fluffy texture. Do try making these gems.... I know it's not something out of the ordinary but anybody who tries them would definitely have only good things to say.... just don't let them talk about the calories. :D


I went overboard with the filling for this piece... hehe..

Pastry Pockets with Nutella Filling
Ingredients:
250g high protein flour (bread flour)
25g milk powder
5g instant yeast (1 tsp)
50g sugar
100g potato
50 ml cold water (I added 3 tsp more water. See note no. 1)
2 egg yolk
40g butter
1/4 tsp salt
vegetable oil for deep frying
Nutella spread (for filling)
icing sugar for coating the pockets

Method:
  1. Steam, microwave or roast the potato. Leave to cool slightly. Remove the skin and blend with the cold water until it becomes a smooth puree. Leave to cool. (I peeled & cut the potato into big pieces & roasted them until cooked & soft. I roasted them because I was also roasting some potatoes for my roasted-potato bread.)
  2. Combine flour, milk powder, yeast and sugar in a mixing bowl. Add the blended potato and egg yolk and mix using the dough hook for about 2 minutes. 
  3. Add in butter and continue mixing for about 2 minutes. Finally, add in salt and mix for another 3 minutes until the dough is smooth & elastic.
  4. Remove the dough from the bowl and shape it into a ball and place it in a clean & greased bowl. Cover the dough with a cloth & leave it to prove for about 45 minutes.
  5. Turn the dough out onto a lightly floured board and knead for 4 minutes or until the bubbles are out of the bread. Leave to rest for 10 minutes.
  6. Roll out the dough evenly into about 1 cm thickness. Using a knife or pizza cutter, cut the dough into rectangle or diamond-shaped pieces. Place the cut pieces onto a floured tray. Cover with tea towel & leave to proof for about 35 minutes.
  7. Deep fry in medium hot oil till golden brown.
  8. Fill up a piping bag with Nutella spread. Using a small plain nozzle, make a hole on one side of the fried pastry & pipe the filling. Finally coat  with fine sugar.
Notes & modifications:
  1. The mixture will look very dry at first, just carry on mixing until a soft dough is formed. If the mixture is still dry, add some more water, one teaspoon at a time until it forms a smooth & soft dough. I think the amount of water needed will depend on the type of potato used. Previously when using this recipe, I did not have to add more water but this time, I added 3 teaspoons.
  2. I started mixing the dough late at night. So after step 3, I placed the dough in an air-tight bowl & left it in the fridge. The next morning, I took the bowl out of the fridge & left it in room temperature for about 30 minutes. Then I continued with step 5.
  3. The above recipe is half the original recipe & it yields quite a lot of pastry pockets. So for small serving, you may want to start with half the above recipe. But I must warn you, these pockets are quite addictive! 

Sunday, 20 September 2015

Black Bottom Milo Banana Bread

I had some unattractive-looking overripe bananas hanging in the kitchen...  Clearly nobody was going to pluck & snack on any of it. But we bakers know that that's the best kind of bananas to bake with, so I wasted no time & baked this wholesome Milo banana bread using the recipe shared by Zoe. 


If you are looking for a soft & spongy banana bread, then I'm afraid this bread will disappoint you because it is quite dense but still moist. It would have been more moist if I had more bananas in hand. However, if you are looking for a delicious & wholesome grab-and-go breakfast or snack, then this is the one as it uses many flavourful & nutritious ingredients like wholemeal flour, bananas, eggs, yogurt & Milo. Give it a try the next time you have overripe bananas lying around in your kitchen.


Black Bottom Milo Banana Bread
Ingredients:
165g wholemeal flour
55g all-purpose flour
2 tsp baking powder
1/2 tsp baking soda (I added.)
1/2 tsp salt
1 cup + 2 tbsp mashed bananas (about 2 extra large or 3 medium banana) - I only used 1 cup because that's all I had.
100g (1/2 cup) caster sugar
60g (1/4 cup) unsalted butter, melted
3 tbsp (45 ml) plain yogurt
1 1/2 large eggs, lightly beaten (I used two 55g-eggs.)
3/4 tsp vanilla extract
50g chocolate malted powder (Ovaltine or Milo) - I used Milo.
non-stick cooking spray for greasing the pan - I used butter.

Method:
  1. Preheat oven to 350°F or 180°C. Spray loaf pan (10 x 20 cm) with nonstick cooking spray and line the pan with baking paper, leaving an extra inch or two overhanging each end. This helps to remove the bread easily.
  2. Combine whole-wheat flour, all-purpose flour, baking powder, baking soda and salt in a medium bowl. Set aside.
  3. Combine bananas, sugar, butter, yogurt, eggs and vanilla extract in large bowl; stir well. Sift in the flour mixture and mix until just combined. Do not overmix. 
  4. Remove 1 cup of batter and place it in a separate bowl. Stir in Ovaltine or Milo & mix until combined.
  5. Spoon the Ovaltine/Milo mixture into the prepared pan. Then top it with the remaining banana batter. 
  6. Bake for 50 minutes or until a wooden stick inserted in center comes out clean. Cool in pan on wire rack for 15 mins. Remove bread from the pan and transfer to wire rack to cool completely.
  7. Slice and serve. To store, wrap in plastic wrap and store at room temperature for up to 3 days.
Sourced from & adapted by Zoe @ Bake For Happy Kids.
Original recipe: Nestle Kitchen.


I'm linking this post to the Little Thumbs Up event, organized & hosted by Doreen of My Little Favourite DIY & Zoe of Bake for Happy Kids.

Friday, 11 September 2015

Beehive Sweet Bun

It's Polling Day here in Singapore & counting of votes is now taking place.... I thought I'd just complete this post while waiting for the results  to be released. Well, I'm pretty sure which party will win for my constituency but, like many Singaporeans, I'm more interested with the results of the hot areas... So it's going to be a long night for us..


This is the honeycomb bun that I made two days ago. Had wanted to bake it long time ago when I saw many Malaysian bloggers showcased theirs. Isn't it gorgeous...? It also tastes finger-licking good! This is one awesome bun which I highly recommend you to bake. Just take a look at the following pictures & see if you are inspired to bake one.


Beehive Sweet Bun

DOUGH
Ingredients:
300g bread flour (high protein flour) - I added about 1 tbsp of flour as my dough was too sticky.
200g plain flour
2 tbsp milk powder
1 tsp baking powder
2 tbsp honey
1 egg
250ml fresh milk
2 tbsp plain yogurt
6g dry yeast
40g sugar
40g butter (softened)
1 tsp salt (I added.)
1 egg + 1 tbsp fresh milk - lightly beaten (for egg wash)
sunflower, pumpkin & black sesame seeds for topping (optional) - You may also use other nuts like almond or walnuts.

USING A BREAD MAKER
      Combine all the ingredients in a bread maker & start mixing using the 'dough' setting. This will take about 1 & 1/2 hour, including proofing time. Then proceed with step 3 below.

USING CAKE MIXER FITTED WITH A DOUGH HOOK (My method.)
      Combine bread flour, plain flour, milk powder, baking powder, honey, egg, milk, yogurt, yeast & sugar in a mixing bowl. Beat on medium speed (I used speed 3.) until well combined. Add butter & continue beating until a dough is formed. Add salt & continue beating until a soft & elastic dough is formed. (I beat for about 15 minutes.) Then proceed with step 3 below.

USING HAND
  1. Combine all the ingredients in a mixing bowl & mix until the dough doesn't stick to your hand. Then transfer the dough into a clean plastic bag. Squeeze the bag for about 8-10 minutes. Remove the dough from the bag & place it in the mixing bowl again. Continue kneading the dough until it becomes soft & elastic.
  2. Leave the dough in the bowl & cover it with a plastic wrap or clean cloth. Leave the dough to rise to twice the volume for about 40 minutes to 1 hour. Leave it in a warm place like in a cabinet or an oven (without switching it on) for best results.
  3. Gently punch down the dough to remove some gas bubbles. Then divide the dough into small balls (about 40g each). Knead & form into smooth balls. Arrange the balls in a baking pan that has been greased with some butter. Cover the pan with a clean cloth & leave to proof for about 40 minutes.
  4. Brush the top of the bun with egg wash. Sprinkle with sunflower, pumpkin & black sesame seeds. Brush with egg wash one more time to ensure the seeds stick to the bun.
  5. Bake in a preheated oven at 170 deg C for about 20 minutes. (I baked for about 35 minutes.)
  6. Once the bun is cooked, remove the pan from the oven & immediately brush the top with some butter or margarine for a shiny look.
  7. Remove the bun from the pan & place it onto a plate. Pour the caramel sauce before serving.
CARAMEL SAUCE
Ingredients:
2 tbsp butter
1/2 cup brown sugar
1/2 cup cream, thick cream or fresh cream
a dash of salt
1 tsp vanilla
1/2 cup fresh milk (when necessary)

Method:
  1. Melt butter in a saucepan.
  2. Add in brown sugar  & continue stirring & cooking until the sugar melts.
  3. Add in cream, salt & vanilla. Mix well & continue cooking until the caramel thickens a little bit. Add fresh milk if the caramel becomes too thick.
Source: Azlita @ Masam Manis.

Notes & modifications:
  1. Azlita used a breadmaker. She also included  the instruction for mixing with hand. I used my Kenwood Major cake mixer, fitted with a dough hook.
  2. I arranged nineteen 40g-balls in an 8-inch round pan & baked the rest of the dough in paper cups.
  3. The caramel tends to thicken up when it's cool.
  4. The bun is best served on the day it's baked. You can also heat up the bun in the microwave oven for about 10 seconds.

Tuesday, 18 November 2014

Satay Buns

I've seen many bloggers baking soft buns, the kind that we Asians like. One of the recipes that has been making its rounds is the Kopitiam Milk Buns that was shared by Sonia. Besides the plain version, she also made use of this recipe to make some curry buns


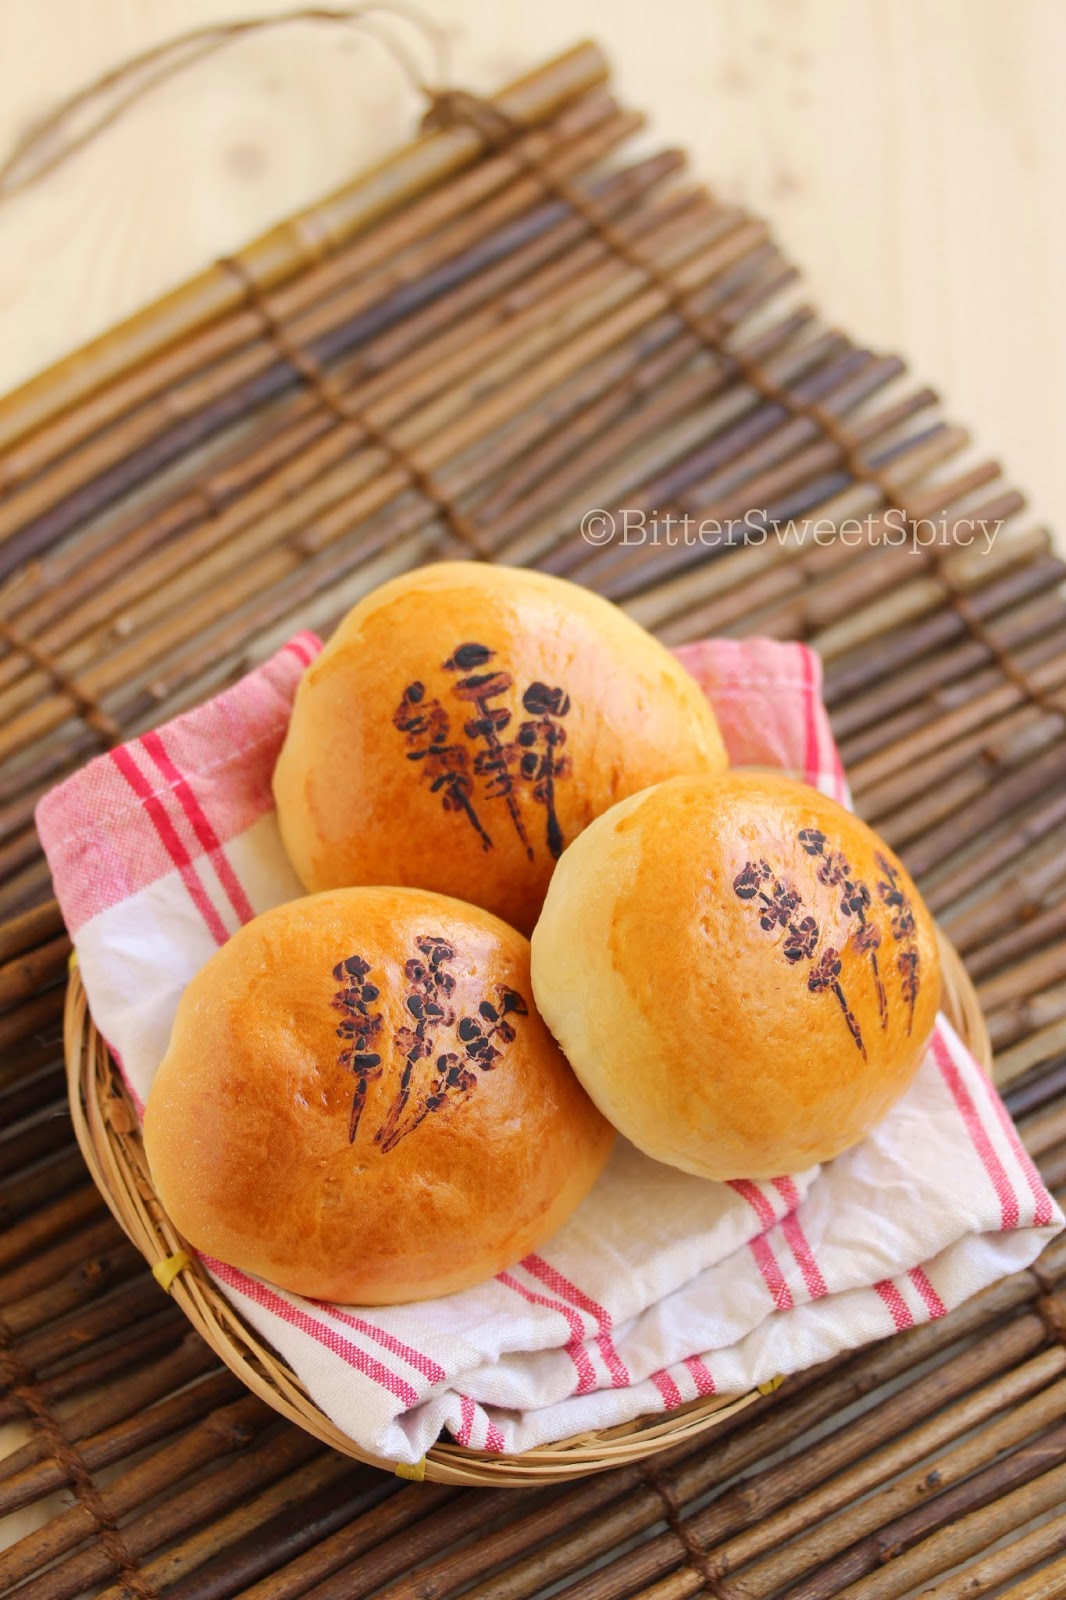
Her curry buns inspired me to bake some filled buns. But I decided to fill mine with beef satay filling. No wonder this bun recipe is so popular. The bun is so soft &, more importantly, it is so fragrant & so delicious! Big thumbs up for this recipe! And the satay filling just makes these buns so irresistible!!


I was also inspired to decorate my buns by one & only Victoria. If you had been following her, you would have seen how she has been showcasing her creativity in her baking products. I can't draw well, so  nobody could figure out that I had drawn some sticks of satay on my buns. They all thought that they were some flowers or wheat! ^_^ 


DOUGH
Overnight sponge dough:
215g high protein flour
125g full cream milk (cold) - I used 135g.
2g instant yeast (1/2 tsp)
Mix all ingredients in a bowl till a rough dough is formed. Cover the bowl with cling wrap and store in the fridge overnight.

Basic dough:
1 quantity of above overnight sponge dough
90g high protein flour
12g milk powder (Sonia didn't use.)
30g egg (1/2 large egg)
4g instant yeast (1tsp)
3g fine salt (1/2 tsp)
60g sugar
45g butter (room temperature) - I used only 30g.
1tbsp milk (cold)
for egg wash, combine 1/2 egg & 1/2 tsp of milk

Method:
  1. Tear the overnight sponge dough into pieces into a mixing bowl. Add in the rest of ingredients, except butter, & knead till a smooth dough is formed. 
  2. Add in butter and knead until dough is smooth, shiny and elastic. (I mixed mine using the electric mixer [dough hook] for about 10 minutes in all.)
  3. Cover the bowl with cling film and set aside to proof till double in size for 45-60 minutes. (I poured the dough onto a floured working surface & mould it into a smooth round. Then I covered it with the unwashed bowl that I used for mixing.)
Source: Sonia @ Nasi Lemak Lover.

BEEF SATAY FILLING
Ingredients:
200g ground beef
1 1/2 tbsp ground coriander seeds
1 1/2 tsp ground cumin
1/4 tsp tumeric powder
1/2 tsp salt (adjust to taste)
3 tbsp very dark brown sugar  - adjust based on your preference
1/8 cup ground toasted peanuts
1 tbsp tamarind juice 
1 tbsp cooking oil
1tbsp cornflour + 3 tbsp water (I didn't use this. Refer to note no. 1. )

ground into paste
4 small red onions
1 clove garlic
2 cm galangal (lengkuas)
1 stalk lemongrass (white part only)

Method: 
  1. Combine all the ingredients above, except the oil & cornflour mixture, & mix thoroughly. Leave to marinate in the fridge for 1 hour. 
  2. After 1 hour, heat up the oil in a frying pan. Add in the meat mixture & stir frequently. If the mixture is too dry, add some water. Once it's cooked, pour in the cornflour mixture & stir well. Transfer the cooked filling into a colander to drain any excess liquid. Leave to cool before wrapping in the dough.
ASSEMBLY
  1. After the first proofing, divide the dough into small pieces & form into small balls. I divided mine into 19 pieces of 30g each. 
  2. Roll out each ball into a dics & spoon filling. Wrap & seal the dough. Place onto a baking pan lined with baking paper. Do the same with the rest. Leave to proof for about 30 minutes.
  3. Once proofed, apply egg wash on the buns & bake for about 15 minutes, in a preheated oven at 190 deg C, or until they turn golden brown.
Notes & modifications:
  1. I find the filling quite dry. Some of it though was so watery that I had difficulty sealing the dough. So I suggest you add the cornflour & water mixture to produce moist filling.
  2. For the drawing on top of bun, I used a mixture of cocoa powder & water to form a paste. Then I used chocolate dipping tool to draw. You can use anything in the kitchen that's suitable for drawing. Apply the egg wash & let it dry a little before drawing. Go to Victoria Bakes to get more amazing ideas to decorate your buns. 

Thursday, 30 October 2014

Swedish Cinnnamon Buns

I've made cinnamon buns many times but they were always the regular buns in which the filled dough is rolled, sliced & baked in a deep baking pan like these. This time, I wanted to try something different, so I did the Swedish way of forming their buns. They are definitely more attractive than the regular buns. Compared to the regular rolls, most part of each Swedish bun is exposed to the direct oven heat. As a result, the bun has more crusty surface & less white, soft & fluffy part. So if you prefer softer & fluffier buns, then the regular rolls would be a better choice.


Here, I used the Kopitiam Milk Bun dough recipe shared by Sonia. This recipe uses quite a bit of full cream milk, so I'm not surprised the buns turned out very flavourful. Besides, it also uses the overnight-dough method, that too adds on to the flavour. Since the buns already taste so good, I ate mind without any frosting. But if you still want your cinnamon buns with cream cheese frosting just like my cinnamon-bun monsters, please refer to my other cinnamon bun posts for the recipe.


I apologise for spamming this post with so many photos. I just love looking at the buns. Besides, I took so many pictures & many of them turned out well. So hope they are enough to motivate you, especially the cinnamon-bun monsters out there, to bake them!


Swedish Cinnnamon Buns

OVERNIGHT SPONGE DOUGH
215g high protein flour
125g full cream milk (cold) - I used 135g.
2g instant yeast (1/2 tsp)
Mix all ingredients in a bowl till a rough dough is formed. Cover the bowl with cling wrap and store in the fridge overnight.

BASIC DOUGH
1 quantity of above overnight sponge dough
90g high protein flour
12g milk powder (Sonia didn't use.)
30g egg (1/2 large egg)
4g instant yeast (1tsp)
3g fine salt (1/2 tsp)
60g sugar
45g butter (room temperature) - I used only 30g.
1tbsp milk (cold)

Method:
  1. Tear the overnight sponge dough into pieces into a mixing bowl. Add in the rest of ingredients, except butter, & knead till a smooth dough is formed. 
  2. Add in butter and knead until dough is smooth, shiny and elastic. (I mixed mine using the electric mixer [dough hook] for about 10 minutes in all.)
  3. Cover the bowl with cling film and set aside to proof till double in size for 45-60 minutes. (I poured the dough onto a floured working surface & mould it into a smooth round. Then I covered it with the unwashed bowl that I used for mixing.)
Source:  Sonia @ Nasi Lemak Lover.

FILLING
butter, softened
cinnamon powder
brown sugar
1 egg - lightly beaten (for egg wash)

TO ASSEMBLE THE CINNAMON BUNS: 
  1. Place the proofed dough onto a floured working surface. Deflate it by punching it down & then shaping the dough into a smooth ball. Leave to rest for 15 minutes.
  2. Roll the dough out into a large rectangle. You want the long sides over twice as long as the short sides. Spread butter over the entire rectangle. Then sprinkle cinnamon powder followed by dark brown sugar.
  3. Fold it into thirds lengthwise. It should measure about 16x8 inch. At this point, you may want to roll out the dough to flatten it a little bit. Cut the roll widthwise  with a sharp knife into 8-10 slices. 
  4. Take a slice of dough & cut it into two almost all the way. Twist the ends of each slice in opposite directions a few times. Lift up the twists in a crisscross manner. Tuck the ends under & seal with a little water if needed. Place the slices onto a  baking sheet which has been lined with silicone paper. Cover and let rise for about 30 minutes.
  5. Preheat the oven to 190 deg C. Brush the proofed buns with the beaten egg. This will give the buns a beautiful golden colour when baked. Bake for about 15-20 minutes or until golden brown. Place the baked rolls on a cooling rack. Serve warm.
Note:
  1. I made the buns twice (& each time 2 recipes!) within a week. The first time,  a recipe produced 8 big pieces as seen in my pictures above. Yesterday, I made 10 buns for each recipe. I like the smaller pieces better.
  2. Please refer to the following pictures & video to better understand the assembly process. The pictures below are taken yesterday when I made 10 buns with 1 recipe.


Tuesday, 30 September 2014

Salted Caramel Apple Doughnuts

I made these doughnuts this morning just because I wanted to make something using apples as I was hoping to submit at least an entry for the Little Thumbs Up event for this month. Actually I was planning to make something more elaborate for the event but I got a little distracted (an understatement!). I had all the ingredients for these easy-to-make & delightful doughnut balls. While waiting for the dough to rise, I kept myself busy on my desktop & finally managed to complete the laksa post. Anyway, if you happen to have all the ingredients, try making these. They are really good!


Salted Caramel Apple Doughnuts

Ingredients:

75 ml milk
25g butter, cut into small pieces
200g plain flour (I used bread flour.)
4g sachet fast-action dried yeast
25g caster sugar, plus 50g extra for dusting
1/4 tsp ground cinnamon, plus 1 tsp (or more) for dusting
1 small egg, beaten
1/2 apple, grated (I used Granny Smith.)
vegetable or sunflower oil for frying, plus extra for greasing
about 200ml salted caramel sauce

Method:
  1. Warm the milk in a saucepan. Add the butter and set aside until the milk has cooled to hand temperature and the butter has melted. Put the flour in a large bowl with the yeast, sugar, cinnamon and 1⁄2 tsp salt, mix well. Make a well in the centre and pour in the warm milk mixture, egg and apple. Combine with a wooden spoon, then tip out onto a work surface and knead for a few mins to combine. Pop into a lightly oiled bowl, cover with oiled cling film and leave somewhere warm to rise until doubled in size – about 2 hrs.
  2. Lightly grease 1 large baking tray. 
  3. Uncover the dough and knock out all the air. Remove a lump of dough, roughly the size of a walnut, and roll into a smooth ball. Put on a tray and squash gently with your palm. Repeat with the remaining dough. Cover the tray with a sheet of oiled cling film and leave to prove until doubled in size again – about 30 mins.
  4. Line a large plate or baking tray with kitchen paper, and mix the remaining sugar and cinnamon on another. Pour enough oil to come halfway up the sides of a large saucepan. If you have a thermometer the temperature should reach 180C. If you don’t have one, drop in a small chunk of bread. The oil is ready when it browns in about 30 secs. Drop in 3-4 doughnuts at a time (depending on the size of your pan) and cook for 4-5 mins until each one is deep golden brown and puffed up. Drain on the kitchen paper, then quickly toss in the cinnamon sugar mixture. Repeat with the remaining doughnuts.
  5. To fill the doughnuts, use a skewer or cocktail stick to make a hole in each one. Wiggle it around in the middle to create a cavity. Transfer the caramel to a piping bag fitted with small nozzle, insert the nozzle into the doughnut and squeeze as you pull it out, filling generously. Continue with the remaining doughnuts. Serve with extra caramel for dunking.
Adapted recipe from BBC Good Food.

Notes & modifications:
  1. I made only half the original recipe. It made 14 fist-size doughnuts after dividing the dough into 30g-balls. I intended to make bite-sized doughnuts but they turned out rather big. Next time, I'd form into 15g balls.
  2. I mixed my dough using my cake mixer using the dough hook until the dough developed a membrane. 
  3. For step 2, I lined the tray with silicone paper & dusted some flour on it.
  4. Instead of filling the fried doughnuts with store-bought caramel-in-a-can, I filled mine with my homemade salted caramel sauce.
I'm submitting this post to the Little Thumbs Up (Oct: Apple) event organized by Bake For Happy Kids with My Little Favourite DIY & hosted by I-Lost in Austen.

Sunday, 24 August 2014

Quiche Toast

I made beef quiches for breakfast this morning. It was quite fast to prepare them as I used sandwich bread for the cups instead of making the pastry base from scratch. It's so much easier but still very delicious. I highly recommend you to make these quiche toasts... I can guarantee your family will like them!


Quiche Toast

Ingredients:
150g ground beef
1 medium onion, finely diced
pinch of salt & pepper
1 tsp oil
12 slices sandwich bread (I used wholemeal.)
2 eggs
⅔ cups milk
a pinch of salt and pepper
⅓ cup cheese, grated (tasty, gruyere, cheddar - any good melting cheese) - I used mozzarella.
1 tbsp finely chopped coriander leaves,
oil spray / oil / butter for greasing pan


Method:
  1. Preheat oven to 200 deg C.
  2. Heat 1 tsp oil in small pan over high heat. Add onion & sauté until soften & slightly caramelised. Add in ground beef & continue cooking until meat turns brown. Remove from heat and set aside.
  3. Cut bread into rounds or just cut crusts off. Use a rolling pin to flatten the bread.
  4. Grease 12 muffin tin holes (I used butter.), then press the bread into the muffin tin.
  5. Place in oven for 3-5 minutes until the toasts are just a bit dry. (The toast cups should not be browned.) Remove from oven and set aside.
  6. Whisk together the egg, milk & a pinch of salt & pepper.
  7. Divide the cooked beef  between the 12 toast cups, then top them with the cheese.
  8. Pour the egg mixture into each cup, almost to the rim, & sprinkle the coriander leaves. Then immediately place the muffin pan in the oven. If you take too long between pouring the egg mixture into the toast cups and putting it in the oven, the egg will start soaking into the bread.
  9. Bake for 15 to 20 minutes until the top is golden and the filling is set.
  10. Remove from oven and rest for 5 minutes before serving. The filling will be puffed up but it will deflate while resting.
  11. Garnish with extra coriander leaves if desired. Serve warm.
Makes 12 toast cups.
Recipe adapted from  Recipe Tin Eats.


Notes:
  1. Instead of beef, you may use any other filling like seafood, ham, mushroom, etc but there's no need to precook the seafood or ham.
  2. Do not use stale bread as it would be difficult to flatten & press it into the muffin hole.
  3. Toasting the bread until it's dry before adding the filling is an important step as it prevents the egg mixture from soaking into the bread.
  4. You need to grease the muffin holes generously as the egg mixture may overflow onto the holes & it then may be difficult to remove the quiche toast.

Friday, 2 May 2014

Super Soft Pumpkin Doughnuts

I've bought Japanese pumpkin several times before but haven't tried making bread or doughnuts with it. So yesterday, I decided to use up the leftover in the fridge after cooking a pumpkin dish for dinner two nights ago. I decided to use the super soft Potato Doughnut recipe by Madam Fatmah  which I've used before. I replaced the potato with pumpkin & made  some other minor modifications.


As expected, the doughnuts are very soft. The pumpkin flavour is very subtle, so much so my kids don't know I've actually added pumpkin. And unlike the pale-looking potato doughnuts, these doughnuts are beautiful, taking up the beautiful orange colour of the pumpkin.


By the way, I've also used the Potato Doughnut recipe  to make Sweet Potato Doughnuts before. So, after making the pumpkin version,  I can certainly say the recipe makes a very good base recipe. Now, what other version should I experiment it with......? Do you have any suggestions?


Super Soft Pumpkin Doughnuts
Ingredients:
250g high protein flour or bread flour
5g instant yeast
50g sugar
100g cooked pumpkin (mashed)
50ml cold milk
2 egg yolks
30g butter
1/4 tsp salt
icing sugar for coating

Method:
  1. Combine flour, yeast & sugar in a mixing bowl. Stir to combine.
  2. Add the mashed pumpkin, milk & egg yolks & mix using the dough hook until well combined, about 2 minutes. 
  3. Add in butter and continue mixing until the butter is well incorporated into the dough, about 2 minutes. 
  4. Finally, add in salt and mix for another 3 minutes until the dough is smooth.
  5. Remove the dough from the bowl & shape it into a ball. Then place it in a clean bowl. Cover the bowl & leave it to prove for about 45 minutes.
  6. Punch the dough down & shape it into a ball. Leave to rest for about 10 minutes.
  7. Turn the dough out onto a floured surface, and gently roll out to 1 cm thickness. Cut with a floured doughnut cutter. (OR, divide the dough into small portions of about 30g each & mould them into smooth balls. Leave them to rest for 10 minutes. Then shape them into ring doughnuts.)
  8. Cover doughnuts loosely with a cloth & leave to rise for about 35 minutes. 
  9. Deep fry doughnuts in medium hot oil till golden brown.
  10. Coat the doughnuts with icing sugar. 
Notes:
  1. I microwaved about 200g of cut raw pumpkin (unpeeled) & once cooked, I scrapped the soft flesh. I got about 100g.
  2. I mixed the dough in the late morning & left it in the fridge to proof for about 5 hours. After taking it out from the fridge, I left it in room temperature for about 20 minutes before proceeding with step 6.
  3. I wanted to coat the doughnuts with cinnamon sugar but I ran out of cinnamon powder. I think these doughnuts would go very well with cinnamon.
I'm submitting this post to Little Thumbs Up May 2014 (Milk) organised by Bake For Happy Kids, and My Little Favourite DIY, hosted by Tze of Awayofmind Bakery House

Thursday, 6 March 2014

Almond Raisin Bread & Cinnamon Rolls

Last weekend, I was pretty busy with my baking. Besides the Pandan Cupcakes, I also baked Almond Raisin Bread &, my family's all time favourite, Cinnamon Rolls. I used the sweet dough recipe from Alex Goh's Magic Bread


The sweet dough recipe made about 1000g of dough. So I divided it into 2 parts & used 1 part for the Almond Raisin  Bread & the other for the Cinnamon Rolls. Both types of bread are similar in that they are both rolled buns, hence the shaping of the buns are pretty much the same. The difference is in the filling. Besides butter, sugar & cinnamon, the Almond Raisin Bread also has almond powder, egg & raisins in the filling. You may want to refer to my other Cinnamon Bun postings for the filling & cream cheese topping.


Almond Raisin Bread

Ingredients:
500g sweet bread dough
almond filling (see below)
100g raisins
sliced almond for topping 

Method:
  1. Grease & line a 20cm round pan. Set aside.
  2. Roll out the dough to about 1 cm thick. At this point, since the dough was quite soft & challenging to handle, I placed the dough on a tray lined with grease paper & put it in the freezer for about 10 minutes. This facilitates the rolling & cutting of the dough.
  3. Place the dough onto a working table & roll it out into a 35 x 23 cm rectangular shape.
  4. Spread almond filling onto the rolled out dough & then sprinkle the raisins.
  5. Roll up the dough like a Swill roll.
  6. Cut  the dough into 10 pieces & arrange in the baking pan. (I used a 7 x 10 inch pan, so I cut the dough into 8 pieces.)
  7. Leave pan in a warm place for about 45 minutes to proof.
  8. Egg wash the top & sprinkle some sliced almond.
  9. Bake in a preheated oven (180 deg C) on the lower rack for about 25-30 minutes.
  10. Once cooked, remove bread from pan.
Almond filling:
50g butter
50g sugar
60g egg
1/4 tsp cinnamon powder
100g ground almond


         Mix sugar & butter until well blended. Add in egg & mix until well combined. Add in ground almond& cinnamon powder & mix well. Set aside.

Cinnamon Rolls


Basic Sweet Bread Dough
[Makes about 1000g of sweet bread dough]

Gelatinised dough:
100g bread flour
70g boiling water
Add the boiling water into the flour. Mix until well blended to form a dough. Cover and set aside to cool. Store the dough in refrigerator for at least 12 hours.

Bread dough:
300g bread flour
100g plain flour
80g sugar
20g milk powder
9g instant yeast
175g cold water
60g cold egg (1 large egg)
all of the above gelatinised dough
60g butter (diced)
6g salt (about 1 tsp)

Method:
  1. In a mixing bowl, combine bread & plain flour, milk powder, baking powder, sugar & instant yeast & mix well. 
  2. Add in egg & cold water & mix until a rough dough is formed. Add in gelatinised dough & mix until well blended.
  3. Add in butter & continue mixing well. 
  4. Finally, add in salt & continue mixing to form a smooth & elastic dough. Check for membrane.
  5. Remove from bowl & mould into a smooth round dough. Place the dough into a greased bowl, and cover. Set in a warm place to rise until double. Dough is ready if you touch it and the indention remains.
  6. Turn the dough out onto a floured surface & divide the dough into 2 parts. Mould each part into a smooth round dough & leave to rest for 10 minutes. The dough is ready to be formed into the cinnamon rolls & almond raisin bread.
Recipe by Alex Goh of Magic Bread, with some modifications to the method.


Related Posts Plugin for WordPress, Blogger...