Sunday, 29 January 2012

Brown Butter Chocolate Chip Cookies

Last week sure didn't feel like a short working week although I, like many in Singapore, only had to report to work for 3 days. Everyday was a mad rush because there's just so much to do! Even so, I've chosen not to touch my school work over the weekend although I couldn't keep it out of my mind. Just thinking about it is enough to cause headache! My husband is not so lucky as  he has datelines to meet. So for almost the whole of yesterday & today, he was  on the computer, trying to complete his work. As for me, besides running the usual weekend errands, I also baked some goodies.


I baked some  chocolate chip cookies. My family loves chocolate chip cookies. But strangely, I seldom bake them. A few minutes ago, my husband was holding the bottle of cookies, munching away... I think that's one reason why I don't often bake them...haha. Anyway, that's about to change. I've bookmarked a  few recipes & when I'm done baking them,  I'll bring some to my workplace so that there'll not be too many left at home....hehe. 


When I saw this Brown Butter Chocolate Chip Cookie recipe on TasteFood, 2 things attracted my attention. First it uses brown butter which produced a nutty flavour cookies & secondly, you'll have to wait at least 24 hours before baking them! You can read the article on NY Times  about the science of keeping the dough before baking it. The way it's mixed is also quite unusual. I baked my dough in 2 batches. The first was baked   using the recommended temperature & time in the recipe. The cookies have crispy exterior and chewy interior. For the second batch, I continued baking for another 10 minutes at 160 deg C. They turned out crispy, in & out. Chewy or crispy, they are delicious!


Brown Butter Chocolate Chip Cookies
Original recipe by Jennifer Kaplan from Made With Butter.

3/4 cup (188g)  unsalted butter
2 cups (280g) unbleached all-purpose flour
1 tsp salt
1/2 tsp baking soda
1/2 tsp instant expresso powder
1 cup (130g) packed light brown sugar
1/2 (100g) cup granulated sugar - I used 80g
1 large egg
1 large egg yolk
2 tsp vanilla extract
1 cup (200g) semi-sweet chocolate chips
Sea salt for sprinkling (I didn't use.)


Method:
  1. Heat a large skillet over medium heat (do not use nonstick). Slice the butter into four or five smaller pieces and add to pan. The butter will begin to melt and foam. Continue cooking the butter until it becomes a beautiful shade of golden brown and the milk solids sink to the bottom, resembling small, dark brown particles. Cooking times will vary, but it can take five to ten minutes to get to this stage. Watch the butter carefully as it can go from just right to burnt very quickly. Remove from heat and allow to cool for several minutes. 
  2. Combine the flour, table salt, expresso power and baking soda into a large mixing bowl and whisk lightly, making sure the baking soda is evenly distributed. 
  3. Once the brown butter has cooled, add both sugars directly into the skillet and combine thoroughly. (If the skillet is not large enough, transfer the butter into another mixing bowl.) Add the egg and egg yolk, mixing well after each addition. Stir in vanilla extract. 
  4. Pour the wet ingredients into the dry ingredients and stir until combined. Stir in chocolate chips. Cover the bowl with plastic wrap. Refrigerate the dough for at least 24 hours or up to 36 hours.
  5. When you are ready to bake the cookies, preheat the oven to 375°F/190 deg C, and line a baking sheet with parchment paper. Scoop out your desired amount of cookies (approximately 2 tablespoons of dough per cookie) and place on baking sheet, leaving enough room for the cookies to expand as they bake. Lightly sprinkle the scoops of dough with sea salt just before baking.
  6. Bake the cookies for about 12 minutes, or until just cooked through. Do not leave the cookies in the oven for too long, as they will continue to bake for a short while after being removed from the oven. If you are using the same pan for another batch of cookies, first allow the pan to cool completely. 

Tuesday, 24 January 2012

Mini Pizza Pie

I'm happy because all that my family planned to do over the long weekend materialized. We saw the Titanic Artifact Exhibition at the ArtScience Museum on Saturday. On Sunday,  I was busy preparing for the next day's gathering & on Monday, we spent the whole day at Pasir Ris Park with my husband's family.


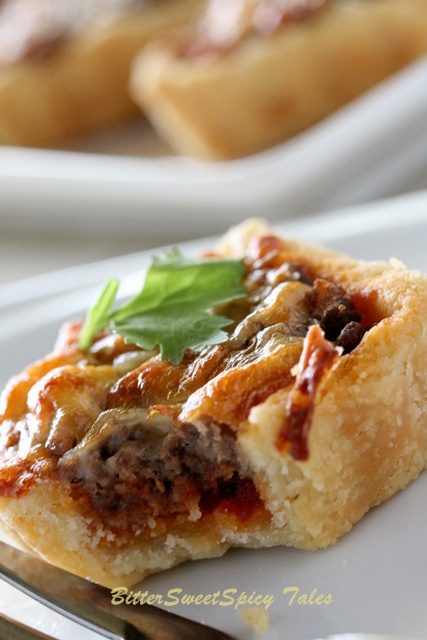
We volunteered to prepare Nasi Lemak (with sambal sotong, of course) & drinks. I also wanted to bake a type of savoury finger food, something simple & something the kids & adults love to eat. I came up with my version of  Mini Pizza Pie. Nothing new or spectacular, just a mini pizza with pastry crust instead of bread base. Still, the pie was a hit at the gathering. 


Just some notes on the making of the pies before I leave you with the recipe. Firstly, I used both butter & vegetable shortening for the pastry in the ratio of 3:1. Butter is for the flavour while the shortening produces a flaky crust. I read this tip from Baking From My Home To Yours by Dorie Greenspan. You can use all butter but your crust will be crispy but not flaky. Another thing, although this recipe uses cold water, I didn't use it at all because my dough was already soft before I added the water. So it's a good practice to add any liquid a little bit at a time when mixing any dough. Finally, make sure all ingredients are cold, especially if you are leaving in a hot country like Singapore.  I even kept the flour in the freezer for few hours!


Mini Pizza Pie

Crust (recipe adapted from 500 Pies & Tarts by Rebecca Baugniet):

280g plain flour
1/4 tsp salt
110g vegetable shortening ( I used Crisco. I weighed & froze it  for few hours.)
230g cold unsalted butter (I cut into small chunks & froze them.)
1 large egg
2 tsp vinegar
2 tbsp cold water (I didn't use at all since my dough was already soft.)
  1. Combine flour & salt in a large mixing bowl. Add cut butter & shortening to flour mixture. 
  2. Using a pastry blender or two knives in a criss-crossing motion, blend butter & shortening into flour mixture until it  has consistency of damp sand, with a few pea-sized pieces of butter & shortening remaining. (I rubbed in fat into flour using my fingers.)
  3. Beat egg & vinegar. Slowly pour egg mixture over the flour, mixing only until mixture is moist. Add water only if dough is not moist enough. The dough should stick together & be able to hold the form of a ball.
  4. Place dough between two pieces of plastic. Smooth dough with a rolling pin so it forms a flat disc of about 1 cm thick. Chill in refrigerator for a minimum of half an hour. Remove from fridge & roll out dough to about 3mm thick. 
  5. Using a round cutter, cut out circles of pastry. Gently push dough into  moulds. 
  6. Bake blind for about 15 minutes or untill pastry is slightly golden in colour. Remove from oven.
  7. Pour about 1 tsp of  sauce into baked shell, followed by meat filling. Then sprinkle grated cheese.
  8. Bake again for about 15 minutes.
Sauce:
spaghetti sauce (I used sauce in a can.)

Filling:
400g ground beef
white pepper
Italian mixed spice
salt
Combine all ingredients & cook until the beef is cooked & is almost dry.

Topping:
Mozarella cheese (grated)

Thursday, 19 January 2012

Really looking forward to a long weekend......

Just now I heard my colleague expressed her relief that tomorrow would  be Friday & that she survived this week. I share her sentiment about tomorrow but I did not quite survive the week. The first two weeks of school have been challenging for me, so much so, on Tuesday, I wasn't able to sleep until 4 am. I was just tossing & turning. By the time I woke up at 6 (I'm supposed to wake up at 5.30.), I was having an intense headache. I knew I wouldn't be able to function with just a two-hour sleep, so yesterday, I took a day off from work. I'm not going into details of my work challenges this year...at least, not now. Suffice to say, I'm not looking forward to them!


Good thing this weekend will be a long one here, in Singapore. Surely my Chinese friends & readers are all so busy with preparations to usher the auspicious Year of the Dragon. Wish you good luck in your preparations! For the rest of us, the additional 2 days off open up more options to our holiday plans! Some of you are probably busy packing to head off for a short getaway. So enjoy & have a safe one! As for my family, we are staying put in this sunny island of Singapore! We've planned to go for the Titanic Artifact Exhibition. My kids have been bugging us for weeks! My husband's family is also planning a barbeque gathering at the beach. So on Monday,  I'll be busy cooking & baking our contributions. I'm looking forward to that!


I know I've been complaining about work but I still try to find time to bake. For me, baking is a stress reliever. This time I chose to bake something very simple but still yummy. It's the chocolate version of the Mexican Wedding Cookies, also referred to as Snowballs or Snow Princess. I found the recipe in The Ghirardelli Chocolate Cookbook. Made some changes  to the amount of  flour & cocoa powder. I'm not disappointed at all! This nutty-chocolaty-melt-in-the-mouth cookie is a winner! So if you are still thinking of a cookie recipe for the coming new year, try this!

Before I leave you with the recipe, let me wish all my Chinese readers Happy Lunar New Year! May you & family have a joyous celebration!


Chocolate Mexican Wedding Cookies
Adapted from The Ghirardelli Chocolate Cookbook.

Dough:
125g butter
1 tsp vanilla
110g plain flour
50g ground almond
10g unsweetened cocoa powder
1/4 tsp cinnamon powder

Coating:
1/4 cup icing/caster sugar


Method:
  1. In a bowl, cream butter & sugar until light & fluffy. Add vanilla extract.
  2. In a separate bowl, combine flour, ground almond, cocoa powder, cinnamon & salt. Mix well. Gradually add dry ingredients to creamed mixture. Wrap dough in plastic wrap & chill for 1 to 2 hours.
  3. Preheat oven at 160 deg C. Shape dough into 1-cm balls (I weighed  8g each.). Place balls 2 cm apart on an ungreased baking sheet. Bake 15 to 18 minutes or untill cookies are firm to touch. Cool for 1 minute on the baking sheet. Then transfer ot a wire rack.
  4. Roll warm cookies in a shallow bowl of icing sugar.

Sunday, 8 January 2012

Kuih Bakar Kentang

Although I was busy driving around running errands in the morning, I managed to make Kuih Bakar Kentang. I've been thinking of having this traditional kuih, the one without potatoes. But since I've bookmarked this recipe when  I first saw it on Dj's blog DapurKu SaYang, I thought today is a good time to try it out.

I love this kuih. It's rich but not too sweet. The mixture was slightly thick so I had difficulty straining it. So I added more milk. I also added pandan juice for a more fragrant kuih.


Kuih Bakar Kentang
Source: DJ & Kak Asmah
Ingredients:
2 potatoes (cooked & mashed)
1 egg
2/3 cup castor sugar
1 cup plain flour
1 cup coconut milk
juice from 3 pandan leaves (I added.)
1/3 tbsp ghee - melted (I used 1 tbsp.)
3 tbsp evaporated milk (I used 4 tbsp fresh milk.)
yellow colouring
sasame seeds


Method:
  1.  Mix egg & sugar. Add flour & coconut milk & mix thoroughly. Strain.
  2. Pour mixture onto mashed potato & mix until well blended. Finally, add ghee & colouring & mix thoroughly.
  3. Grease baking pan. Pour mixture into pan & sprinkle sesame seeds. Bake for about 30 minutes.

I made a blunder !!!

My entry  'A brand new year & my brand bundt pan....... ' which I posted on Monday is gone....... It was my mistake. I started typing that entry using my netbook. Then I moved to the desktop to edit my pictures leaving the netbook power on. After editing the pictures, I completed my entry & published it. When I returned to my netbook, it was already out of battery. So I just closed it & kept it in the bag. This morning, when I charged the battery & switched the netbook on, my unsaved edit page of that entry was staring at me! I tried to sign out but I was asked to save my edit. So I did. Big mistake! In doing so, my published post was erased & what I saved was my incomplete post, just the recipe, no pictures & no rambling.......


So now I'm posting the recipe & pictures of  my Chocolate Banana Cupcake again. I baked them using my  Nordicware Garland Mini Bundt Pan which I bought from Tott recently.

Chunky Chocolate & Banana Cupcakes
Recipe by Carol Pastor from Cupcakes.
Ingredients:
90ml/6 tbsp low-fat milk
2 eggs
150g/5oz/2/3cup butter, melted
225g/8oz/2cup plain flour (I used cake flour.)
1 tsp baking powder
150g/5oz/3/4cup golden caster (superfine) sugar
150g/5oz plain (semisweet) chocolate, cut into chunks (I used semisweet chocolate chips.)
2 small ripe bananas, mashed


Method:
  1. Preheat oven to 200deg C/400 deg F. 
  2. Arrange 12 paper cases in a muffin tin. (I greased my bundt pan & sprinkled some flour.)
  3. In a small bowl, whisk  milk, eggs & melted butter together until combined.
  4. Sift together flour & baking powder into a separate bowl. Add sugar, chocolate & bananas to flour mixture. 
  5. Stir gently to combine, gradually stirring in milk & egg mixture, but do not beat it. Spoon mixture into paper cases. 
  6. Bake for about 20 minutes (I baked for 30 minutes.) until the cakes are risen & golden. Allow to stand for 5 minutes, then turn out & leave to cool on  a wire rack.
Related Posts Plugin for WordPress, Blogger...